Learning Journal for BA(Hons) Design Practice
By Hani Batrisyia (Domain: Fashion)

drawing & making a (textiles)
YEAR 1 SEMESTER 1

week 1
Drawing/Direct Mark Making
Mark making can be done using found nature objects, home items, and any other kind of object that isn't your typical paintbrush, to develop drawings with mark making techniques to produce design motifs.
It also describes the different lines, dots, marks, patterns, and textures we create in an artwork. It can be either loose, gestural, controlled and neat.
It can apply to any material used on any surface: paint on canvas, ink or pencil on paper, a scratched mark on plaster, a digital paint tool on a screen, and etcetera.
In our case, I used Chinese ink bought from Daiso and watercolour paper, and used a selection of other materials both natural and everyday items to dip into the ink.
For most of the paper used, I had no motifs or any sort of idea on the kind of patterns that I wanted to make, so I was really just playing around with the concept of mark making and trying my best to make the marks look coherent. As time went by and I created more paintings, I had the idea to paint fire and smoke to simulate the burning of excess clothing caused by major fast-fashion companies such as Shein, H&M, Zara, and etc.
Research
Somewhere along the line of making random strokes on paper, I had the idea of basing my topic of sustainability around the burning of textiles/clothing due to over production by fast fashion brands such as H&M and Shein. I researched on artwork that were similar to my line of thought and tried to imitate their strokes with the materials that I had.
Painted by Jacqueline Tam, who is an illustrator based in Brooklyn, New York. She holds an MFA from the School of Visual Arts in Illustration and has worked on editorial, advertising, packaging, book, and fine art commissions. Movement and emotion are consistent themes in her work and she often draws inspiration from the natural world to represent our shared and intangible human experiences.
When a wash of ink spreads across the paper in an unanticipated way, we can become the creator of an exquisitely made mark. This kind of encounter can often happen when we approach a sketchbook with an attitude of play—with a new tool or a new way of moving the hand across the surface of the paper. Stamping with ink, drawing with a comb, and painting on yupo paper were used to experiment and created to form unique and unexpected textures such as the image shown on the right.

Jacqueline Tam, 2023

Where the Ocean Meets the Sky by Lawrence Terry
Photo by Timothy Hill
Next, is an artist who uses actual smoke in his artwork. Lawrence Terry has discovered a way to harness its power and predictable (if potentially dangerous) qualities. His mark making techniques involve manipulating fire and smoke to create abstract, mixed-media art that is “built.”
Introduced to fire in a Raku ceramics class and a welding class during the same semester at Louisville School of Art in the 70s, a few years later he had a candle burning and started playing with the smoke and a piece of paper to explore the carbon effect and the rest is history.
The burning is mechanical. Lawrence uses a torch, which produces hues in the sepia family. Using a candle flame, the smoking is more organic. The candle flame produces colors in the carbon family that range from deep black to whispers of grey, which is more cloud-like. Line carving is done with various tools, including a Dremel.
My Take on Mark Making and the Materials used

Toothbrush

Facial Brush

Crumpled wrapping paper

Yarn

Leaves taken from the ground

Plastic glove

Artificial leaves and flowers

Straws

Chinese Ink
Results of mark making (in no particular order):

The first piece made. Just as a way to test out what shapes/silhouettes do my materials make, I used as many as possible to create this artwork of leaves, using the rough side of the plastic glove, brush to elongate certain lines and to complete shapes, facial cleanser brush to form multiple brush strokes at once.

Made with no intent. Using the rough side of the plastic glove to create the spotty texture, toothbrush bristles to stroke across the paper, and my own hand to form the blotches of ink.

Another random piece of testing out the shapes made using the tips of the facial cleanser brush, the end of a straw, artificial leaves, and moving my hands in different directions.

At this point, I had the idea of revolving my theme around air pollution caused by textile factories and the burning of excess clothes, so I painted smoke and fire using the bristles of the facial cleansing brush.

Same idea as the previous painting, but in landscape. The 'smoke' effect was created using light strokes of the facial cleanser brush. The leaf silhouettes above the flames were added in a way that resembles making the fires grow larger.

Thin strokes were made using toothbrush bristles, spots shown on paper formed by sprinkling bits of ink using my fingertips.
Reflection on Mark Making:
This activity takes me back to when I was younger, as I've done mark making before but with scrap food, like orange peels, uncooked pasta (macaroni, spaghetti), and more. Doing this as on the first week (and first day) of school was much more exciting as I got to use my hands for something that isn't hunched over and drawing away with my tablet at my laptop. It was hard to compose a piece that held meaning as I was mainly testing out the kinds of shapes and textures that my materials would bring, and when I finally thought of a topic to base my mark making out of, it was taxing to recreate smoke out of solid objects. But, by having one idea rejected, more ideas would shine through. Exploring the art of mark making with black ink was a transformative and liberating journey into the world of abstract expression and creativity. Beginning the project was an open canvas, both figuratively and literally. The sheer freedom and lack of constraints in mark making were simultaneously exhilarating and intimidating. It felt like a journey into the uncharted territories of my imagination, as I was restrained by using only the materials I had on hand. But I enjoyed the process of trial and error to see what topic works for me for future exercises.
Mood board
Topic: in relation to sustainability
After we were done with our mark making, we were tasked with creating a textile mood board to base our next textile exercises on, which is obviously about sustainability. This was a real challenge for all of us because as compared to something like architecture, where you could grab it's patterns from the buildings directly, it's tough to think of patterns/motifs that would properly describe the chosen sustainability topic.
Before I chose the actual topic that I wanted to work on, I made three different moodboards with their own mind maps as shown:
1. Air Pollution

As mentioned previously, I had the idea of choosing the topic of burning clothes due to overproduction, thus causing air pollution, though the more I thought about it, the more I realise it would be quite difficult to form patterns to describe air pollution. I still made the moodboard anyway to see if it would inspire more ideas within me, but unfortunately I couldn't come up with anything tangible, thus this idea was scrapped.
2. Lack of human rights in clothing factories

After the failure that was air pollution, the reality of the lack of human rights within fast fashion factories came to mind. But then again, the more I tried incorporating it's patterns into the textiles is when I hit a roadblock of ideas.
Thus, this was scrapped.
3. Recycling fabric from old garments to be made into something new

Mindmap

Finally, after two failed ideas, I came up with the thought of my topic being about upcycling clothing, so that my textures and patterns would imitate those of textiles such as plaid patterns, the feel of corduroy, and more. My chosen topic also matches with the theme of sustainability, as upcycling clothing reduces buying more apparels and designing different ways to wear existing clothing.
Included is a mind map of reworked fashion:
- Often made with different fabrics/patterns/textures which has been used before
- Buying vintage clothes/thrifting used apparel to remake them into something new or combine them with one another
- Inspired by the various textures & patterns that make up something new
- Sustainable to the environment as no fabric is wasted, for example, multiple vintage shirts make up patchwork tops/bottoms, or not stopping at just clothing but also any type of fabric including from bags
I was also advised to branch out into recycled fibres or leftover food to add more patterns into the motifs.
What is upcycled clothing?
Upcycling (sometimes known as creative reuse) means repurposing old, disused, broken and unloved items into something that provides value again. Essentially, it's about turning trash into treasure. It can refer to objects or waste materials that would otherwise be destined for landfill.
Examples of upcycled clothing as shown:

Denim patchwork jacket

Shirt made of different patterns

Dress made of what looks to be a rice sack with embroidery by Maison Martin Margiela Haute Couture Fall 2015
Brands that have produced upcycled clothing
Maison Margiela

Maison Margiela autumn/winter 2020. From project 'Reclica', it is a nifty portmanteau that fuses ‘recycle’ and ‘replica’—builds on the house’s Replica line conceived by Margiela and is Galliano’s exploration of transforming vintage clothing into very new, very now pieces for a current season.
Louis Vouitton

Louis Vuitton Spring - Summer 2021. Presented through the childlike grammar of fantasy, Men’s Artistic Director Virgil Abloh seeks to de-programme our minds from the images of obsolescence that lead to overload, overproduction and waste.” Thirty looks are made from new material, 25 are from materials recycled from the atelier’s previous collections, and 25 are looks from the previous collection.
Emporio Armani

Emporio Armani’s new R-EA capsule collection for men and women uses recycled, regenerated or organic materials. In these eco-woke times, wear your eco credentials on your clothes and spread the sustainable fashion message far and wide when you go out and about. Many of the pieces from the R-EA (Recycled Emporio Armani) collection comes emblazoned with the bold writing “I’M SAYING YES TO RECYCLING”, helping you amplify the call to embrace “upcycled” wear.
Why choose this topic?
I chose upcycling as my focus as I've always been intrigued by the many different patterns and fabrics that goes into making an upcycled apparel and how to make them look good, especially when different materials combine together. I myself own multiple upcycled clothing and am looking into crafting them using my own materials.
Week 2
Cyanotype and Monoprinting
Cyanotype is a slow-reacting, economical photographic printing formulation sensitive to a limited near ultraviolet and blue light spectrum.
It produces a cyan-blue print used for art as monochrome imagery applicable on a range of supports, and for reprography in the form of blueprints.
Cyanotypes are one of the oldest photographic printing processes in the history of photography. The distinctive feature of the print is its shade of cyan blue, which results from its exposure to ultraviolet light.
First introduced by the astronomer, scientist, and botanist John Herschel in 1842, the cyanotype is one of Herschel’s most influential contributions to photography, engineering, and architecture.
How do cyanotypes work?
When ferric ammonium citrate or ferric ammonium oxalate is mixed with potassium ferricyanide, it becomes sensitive to UV light.
These chemicals can be painted onto paper or fabric and left to dry in a dark room. Once dry, objects can be arranged onto the paper and placed in the sun.
The UV rays from the sun react with the chemicals on the paper to create the recognisable cyan-blue background. Where the paper has been covered with an object it will remain white.
Unfortunately, the weather was not on our side on the day we decided to do the cyanotype print, so we used a UV curing machine instead as a substitute to sunlight.
Once the chemicals are rinsed off with water, fixing the print so it is no longer sensitive to the sun, the end result is absolutely stunning.


UV Curing Machine
Research


Blue Way Jay by Sue Pedley
In view of my topic revolving around fabric, I sought out artists that made cyanotypes show texture. I stumbled across Sue Pedley's online portfolio and was inspired by her use of garden-related textiles
Sue Pedley said, "In the galleries themselves I exhibited cyanotype photograms of various objects: plants (virginia creeper, lavender, leaves, grasses); garden-related textiles like netting and hessian; bamboo blinds; and perforated buckets. My research entailed fossicking through cultural and biographical documents, including the mythologised narratives of both sites. Equally important were the the sensations evoked by both places, drawn from times spent physically immersed in their sounds and sights."
Blue Jay Way was exhibited at Heide Museum of Modern Art , Melbourne, and Penrith Regional Gallery, Emu Plains, NSW.
I did not have access to the materials she mentioned, but I tried recreating the textures with cut out corduroy and a jersey knit shirt. Unfortunately, the patterns didn't last long and they soon turned into solid squares.

As I was searching for inspiration, I came across this image of what looks to be mesh and remembered that I had small square of mesh fabric. In hindsight, I should've cut a bigger piece as the one that out in my cyanotype print was quite small and overshadowed by the other materials.
Unfortunately, no further information was provided by the artist on her piece shown on the left side of the screen.
Untitled (Chain Mesh Cyanotype), 2018
Cyanotype on paper. Paula Crown
My take on cyanotype

Steps:
1. Mix equal parts potassium ferricyanide and ferric ammonium citrate into a container.
2. Use a sponge brush to lather the mixture onto fabric (in our case we used cotton) equally across all corners and edges.

3. Arrange all objects on the fabric.


4. Place the fabric and objects face down in the UV curing machine.


5. After the UV process is complete, soak the fabric in water to rinse the chemicals and also to rid the fabric off its sensitivity to normal light.

6. Blow dry fabric for easy storage.

Finished! Materials used were recycled fabrics (corduroy, mesh, cotton), artificial leaves, buttons, and crumpled paper. I chose the fabric that was placed on my cyanotype as they were the only fabrics I had on hand and I wanted to see if the weaving and pattern on them would turn out properly on the finished cyanotype. The leaves were placed to fill up space, but if I were to do this again, I would cut bigger pieces of fabric and also add a wider variety of them.
Reflection on Cyanotype:
I did this exercise completely blind in a way that I wasn't expecting what the end result would look like, but I was pleasantly surprised to find that the prints came out so clean. Unfortunately though, some pieces of fabric that I laid out eventually got smudged within each other that they became rectangular blobs. The process was tedious to me in the sense that there were particular measures to take, such as to not leave the room with the fabric after brushing on the cyanotype liquid, but thankfully I didn't make the mistake of messing up my print. The initial stages of the project involved preparing the light-sensitive solution and applying it to the chosen substrate, and this felt like a magical alchemical process, where chemical reactions between iron compounds and light transformed a blank canvas into an opportunity for artistic expression. If I were to do this exercise again, I would choose not to be restricted by the choice of botanical specimens and everyday objects, and instead use a more wide variety of objects from outside that category, such as having more fabric samples with unique textures, and perhaps some yarn/string. The moment when the print was revealed after rinsing was always filled with anticipation. The deep Prussian blue and ethereal white areas created an otherworldly effect, reminding me that art can emerge from the marriage of chemical reactions and creative vision. As someone with a love for blues, I was stunned with how pretty the print came out. One of the most fascinating aspects of cyanotype was its unpredictability. Each print was a unique interplay of light and shadows, a visual record of the moment when nature and art collaborated. Of course there would be imperfections, but they add character to the prints and gives reason to form cyanotype prints with new knowledge knowing what I do now.
Monoprinting
Monoprinting is a type of printmaking where the intent is to make unique prints. Other methods of printmaking create editioned multiples, the monoprint is editioned as 1 of 1.
It is made from a smooth surface or ‘plate’ coated in printing ink such as a sheet of glass or metal. In contrast with other printing techniques, only one final image is made, making the technique closer to drawing or painting than other print processes.
In our case, we had neither glass or metal, so we used a sheet of A3 paper to be pressed onto our cotton cloth.

Monoprinting, unlike other printing methods, the image created is only made once. This allows for more unique creations, but with more flexibility, as you can use a combination of monoprinting techniques including printing, drawing, and painting. Other forms of printing can be used to create multiple original prints, but monoprinting can only be made a single time.
On the other hand, monotype printing is a quick way to create an original single print, which can be done on a smooth, and non-porous surface, once-off. However, this can also be used more than once, which is known as “ghost printing”. These are taken after the first print or impression, so you will have a slightly faded look.
Research

In my search to find inspiration for monoprinting in regards to my topic revolving around fabric, I stumbled upon website showing how to print usig scrim, a woven material that may be either finely woven and lightweight or coarsely woven and heavy.
Starting off by pulling away threads from the scrim to fray the edges, the artist then manipulates the fibres to create gathers and holes.
I came across this print on Pinterest, but unfortunately I was unable to find further information regarding the type of fabric used.
I was intrigued nonetheless and sought after more prints with obvious fabric weaving patterns to use as my source of inspiration.
ERIN CONSIDINE, cinoh: “1084327: Weaving, monoprinted. 2009


After seeing this piece I realized that I was unable to recreate a similar piece using my own swatches of gingham, but I would be able to carve out the plaid pattern instead on another surface and use it as some sort of a stamp.
Though mine ended up being thin lines instead of thick, I think the effect still remains in the last monoprint as shown below.
squares 5, 2015, monotype on rice paper, 20.8x14.8cm, Margo Plenge
My take on monoprinting

Printed in red and blue ink, laid with artificial leaves, recycled corduroy fabric, leaves, and mesh. The leaves were placed as an afterthought to take up space. I wanted to recreate the images I researched but in hindsight I should've cut out larger pieces of my own fabric.

As my topic is based on upcycling fabrics for other purposes, I used more pieces of corduroy, mesh, and a jersey knit fabric to imitate their textures.

Printed in red and blue ink, laid with artificial leaves, recycled fabric, leaves, and mesh. I used cut out squares of fabric to show their textures, but as mentioned above, I wish I had cut them out into larger sizes to properly show the shapes.

Printed in red and blue ink, laid with linocut of plaid pattern to simulate the fabric's texture.
Reflection on Monoprinting:
Truth be told, I actually didn't know how to place my materials and the ink, so I was stumped for a few minutes thinking of the multiple possibilities to position my fabric the way I wanted it to be, and in the end I decided to just go for it. I quite like the way the mesh and corduroy fabric ended up, though the ink could've been placed more evenly for proper distribution across the cloth.

Week 3 & 4
Shibori Tie-Dye using Natural and Artificial Dyes
What is Shibori tie dye?
Shibori is a Japanese tie-dye technique dating right back to the eighth century. It originally came from China but gained popularity in Japan during the Edo period.
Shibori is a pinnacle of Japanese culture and has been used to decorate garments and homewares for thousands of years. The uneven lines created by the technique are a visual representation of the Japanese belief in the beauty of imperfection.
Where does the word Shibori come from?
The word shibori derives from the Japanese word shiboru which means to squeeze. In shibori tie dye, the fabric is squeezed in a number of different techniques to create the iconic pattern.
What is the best fabric for Shibori tie-dyeing?
Shibori tie-dyeing tends to work best on silk, cotton and hemp fabrics.
As sources of dye were limited in earlier times, an organic indigo colour was often used. We have used this traditional indigo colour in our tutorial but for a more modern approach, you could use a neon, pastel or brightly coloured dye.
Research

Hand dyed by Rina in her Winnipeg studio and no two items are ever the same, this buttery organic cotton mull is a generous size; it is a substantial shawl, scarf, wrap or sarong. Breezy and light.
It has a clean finish with a rolled hem in a beautiful dark periwinkle and white colour. The size is approximately 110 cm x 228 cm (43" x 90").
I was entranced by how clear the squares looked on this scarf and it compelled me to replicate it during this tie-dye exercise as I thought that it resembles a plaid pattern, and seeing how my topic revolves around fabric, I think it matches quite well with my intentions.
Hand Dyed, Organic Cotton Mull, Itajime
Handmade by Rina, owner of TogetherAndGo on Etsy
https://www.etsy.com/listing/1042180883/hand-dyed-organic-cotton-mull-itajime
Made by the Artists Coalition of Flagstaff, this scrunch tie-dye shirt was dyed in various shades of blue to give the cloudy/smoky effect.
I hoped to have my own rendition be as clear as what's shown to portray the different colours from my moodboard's colour palette.
ADULT TIE-DYE SHORT SLEEVE T-SHIRT, PATTERN: “BLUE SCRUNCH"

Tie-dye Exercises

Tying Method: Itajime
The most classic shibori look. Itajime is a technique where you fold a piece of fabric and then clamp it between two objects. The area that’s covered will remain undyed in the dyeing process. We sawed a piece of thin wood and drilled holes for wing nuts to make itajime clamps, but woodworking clamps, rubber bands or string work just as well.
To create a traditional Itajime pattern:
1. Accordion fold or “fan fold” the fabric in 4.5-inch / 11.5-cm wide folds down the length of the fabric. This will form a long rectangle. For more pattern variations, vary the size and width of the folds.
2. Accordion fold or “fan fold” the long rectangle into a 4.5-inch / 11.5-cm fabric square.
3. Sandwich the fabric square between the 4-inch / 10-cm blocks of wood.
4. Secure “sandwich” with rubber bands to tightly hold the fabric square together.
Final Result

What is the idea behind this?
I chose this method to see if I could conjure geometric lines and shapes when it's unfolded.

Tying Method: Accordion fold with ice cream sticks
To create the accordion folds:
1. Lay damp fabric out flat horizontally on covered work surface. Starting on the side closest to you, accordion fold (over & under) the entire fabric in even folds, working your way to the other side.
2. Bind your folded cloth by wrapping rubber bands around it, evenly spacing your rubber bands several inches apart. You can even wrap more around your fabric closer together; the more rubber bands you use, the more white space and accordion tie-dye patterns you’ll have in between your dye areas.
3. After folding the accordions, attach wooden ice cream sticks on the top and bottom of the folded fabric to sandwich it together and secure with raffia string.
Final Result

What is the idea behind this?
I chose this method due to the square pattern it creates when the fabric is unfolded and I wanted it to look like it resembles patchwork.
Tying Method: Scrunch
_HEIC.png)

To create the scrunches:
1. Damp the fabric and scrunch a section of it.
2. Secure with rubber bands or raffia string tightly to ensure that no dye escapes.
3. Repeat scrunching across various sections of the fabric. With each section, vary the amount of fabric scrunched. Continue until majority of the fabric is scrunched.
4. End off with shaping the whole thing into a ball and secure with even more rubber bands.
Final Result

What is the idea behind this?
As part of my upcycling topic, I used an old t-shirt of mine as the fabric in which I wanted to use this tie-dye method on. I chose the scrunch method as I was intrigued with the cloudy effect it would give.
Tying Method: Swirl (using natural dyes)

Preparing the natural dye (spinach)
I offered to prepare green dye using baby spinach for the class. Below are the ingredients and steps I followed to a T to ensure that I extracted the dye correctly.
Ingredients
-
4 cups of fresh green spinach
-
Saucepan
-
10 cups Tap water
Steps
-
Start by chopping spinach and place it in a small saucepan.
-
Now, pour twice as much water as you have spinach. Turn on the stove and bring it to a boil.
-
Keep stirring, then allow it to cook on low flame for an hour. And then turn off the stove.
-
Once the mixture has cooled, strain it well and now can start using spinach to dye fabric.


Step 1. Chop up the spinach into tiny bits. This took me quite awhile as the knife I used was not as sharp as I thought it would be, thus making me take more time than expected, but the end result was worth the effort.


Step 2. Dump the chopped up spinach into a pot of water and bring it to a boil.

Step 3. While stirring, lower the heat to as low as it could go and let it simmer for one hour. When the hour is up, turn off the flame and transfer to a bowl and prepare to separate the spinach bits from the juice- I mean liquid.

Step 4. Strain the bits from the liquid by using a strainer. In my case I didn't have a big one so I used a small tea strainer. This step took the most strength out of me as I underestimated the amount of liquid held in the spinach bits. I strained it as best as I could and threw the bits away.


And finished! The end result looked like sewage water to be honest and the smell is not pleasant (so is the taste).
To create the swirl tie-dye:
1. Lay damp fabric flat on your work surface.
2. Pick a spot on the fabric for the center of your spiral. Pinch a small section of fabric. Hold on to that small section while you twist your fingers clockwise.
3. Keep twisting. As you twist, keep your fingers close to the surface of the table so that the spiral stays flat. The fabric will fold around itself, like a flat cinnamon roll. Keep twisting until the entire item is rolled up.
4. Secure the fabric bundle with three or more rubber bands, crossing them over the center of the spiral. This will create wedge-shaped areas between the bands.
What is the idea behind this?
This tie-dye was made solely to test out the natural dyes. I used my spinach dye, the blueberry dye, and tea dye but unfortunately, not much of the dyes were visible as they came out very faint.

Final Result

Tying Method: Mix of scrunch and accordion folds
To create the scrunches and accordion folds:
1. Starting on the side closest to you, accordion fold (over & under) the entire denim in even folds, working your way to the other side.
2. Scrunch a section of it and scure with rubber bands tightly to ensure that no dye escapes.
4. End off with tying the whole thing with even more rubber bands.
What is the idea behind this?
As my topic revolves around the usage of already existing fabric that I have, I thought it would be fitting to try out this exercise using a cut out piece of denim from a denim jacket that I had purchased from Bricklane Vintage, London. As this jacket was already bleached, I wanted to try bleaching it as well due to it being a dark colour, thus no normal dye would be able to penetrate through the fabric. As for the method used, it was the only method(s) I could think of that is easy to fold due to to denim being quite thick.
Final Result


Tying Method: Kanoko


To create the Kanoko tie-dye:
-
Wet fabric and squeeze out any excess water.
-
To create a traditional Kanoko pattern, pinch the center portion of the fabric and hold it in the air, letting the 4 corners drop.
-
About ½” from the pinched center, wrap fabric tightly with a rubber band.
-
Continue by wrapping twine in a crisscross pattern down the length of the fabric. Pattern will vary based on the spacing and wrapping of the twine.
What is the idea behind this?
Rather than create a print in relation to my topic, I was more curious of the colour the dye would form, seeing as how it would fade as it dries. As my moodboard has the colour of a muted red in it, I thought to experiment with the Kanoko tie-dye method, seeing as when tightly bound, it creates obvious folds and ripples along the fabric. When unwound, the fabric forms a unique texture of wrinkles starting from one part of the fabric, and I thought that it looked quite pretty and fitting to my topic of reused fabric, but furhter into the fabrics aspect of it.
Tying Method: Accordion Fold

To create the accordion folds
-
Wet fabric and squeeze out any excess water.
-
Lay your damp shirt out flat horizontally on your covered work surface. Starting on the side closest to you, accordion fold (over & under) the entire shirt in even folds, working your way to the other side.
-
Bind your folded fabric by wrapping rubber bands around it, evenly spacing your rubber bands several inches apart.
-
After the dye colours have completely set, remove the rubber bands by carefully cutting away from your project. Rinse, wash and dry separately
What is the idea behind this?
I was intrigued by the texture and pattern that the accordion fold method would give, given they it must be tied at certain areas to prevent unravelling and to prevent the liquid dye from seeping to areas where it shouldn't. The red-sih markings on the fabric though, were placed by accident. I was picking up the fabric with red dyed hands, leftover form the previous tie-dye (kanoko) and didn't ought to was my hands first before handling a new piece. But honestly, I think those markings add character to an otherwise plain pale blue fabric.
Reflection on Tie-Dye:
Attempting the various tie-dye techniques were both captivating and challenging. The process of folding, binding, and dyeing required a balance between creative expression and scientific precision. This exercise also expanded my skills in tie-dye and textile art while providing a deeper appreciation for the hidden beauty within the folds. Tie-dye also encouraged me to approach creativity with a more eco-conscious mindset, seeking to minimize waste and make art from the discarded.

Week 5
Sashiko and Boro

What is sashiko?
Sashiko (刺し子?, literally “little stabs”) is a form of decorative reinforcement stitching (or functional embroidery) from Japan. Traditional sashiko was used to reinforce points of wear, or to repair worn places or tears with patches. Today this running stitch technique is often used for purely decorative purposes in quilting and embroidery. The white cotton thread on the traditional indigo blue cloth gives sashiko its distinctive appearance, though decorative items sometimes use red thread.
What are the different types of sashiko?
The generic style of sashiko embroidery follows a geometric pattern divided into five main kinds. Moyozashi uses running stitches to create linear designs, while in hitomezashi, the structures emerge from the alignment of many single stitches made on a grid. Kogin, which means small cloth, is a type of darned embroidery from the Tsugaru district of Honshu. Shonai sashiko, which comes from the Shonai region of Yamagata prefecture, has straight lines that cross each other. And if the art uses indigo-dyed threads, it is called kakurezashi.
What is boro?
Boro (ぼろ) are a class of Japanese textiles that have been mended or patched together. The term is derived from the Japanese term "boroboro", meaning something tattered or repaired. The term 'boro' typically refers to cotton, linen and hemp materials, mostly hand-woven by peasant farmers, that have been stitched or re-woven together to create an often many-layered material used for warm, practical clothing.
Historically, it was more economical to grow, spin, dye, weave and make one's own clothing over buying new garments, and equally as economical to re-use old, worn-out clothing as fabric for new garments; warmer fibres such as cotton were also less commonly available, leading to the development of layering as a necessity in the creation of lower-class clothing.
What about.. boro stitching...?
The raw simplicity and functional beauty of the boro artform is something that has been adored for some time.
Boro is essentially the practice of using a simple running stitch (a sashiko stitch) to reinforce a textile item using spare or would-be-discarded scraps of fabric. It is a practice that grew out of necessity in medieval Japan, and has evolved, four centuries later, into a distinctively gorgeous textile artform. Like sashiko itself, boro combines practical functionality with beauty.
Research
Seeing as boro stitching correlates directly to my theme in terms of upcycling fabric to turn them into something new, I was excited to try it out. But of course before doing anything, I had to research on the designs that I would want to do for my take on sashiko and boro textiles.

Central to boro is the concept of finding beauty in mending—that nothing should ever be wasted, and that imperfections have their own subtle and simple appeal.
Just as sashiko embroidery has become a popular worldwide textile craft, so has boro. It has transcended its origins to become a form of textile design and artistic expression. A number of influential Japanese sashiko artists are active in the creation and exhibition of some exquisite boro textiles.
Sashiko artist Keiko Futatsuya creates boro pieces with antique or vintage Japanese fabrics and vegetable dyed sashiko threads to capture that traditional ethos and feel. In 2016, Indigo Niche exhibited some of Keiko Futatsuya’s boro work at the Brisbane Craft and Quilt Fair, and it generated a lot of interest.
Made by Keiko Futatsuya, exhibited at the Brisbane Craft & Quilt Fair in 2016
Made by @byefrisbie on Instagram, I found his account by chance on my explore page. His work revolves around upcycling materials to turn them into unique bags and occasionally apparel as well. I admire his excellent craftsmanship and I like that some of his work matches my style too.
This bag shown was made from scraps of thrifted jeans the artist used in previous projects, a lot of hand stitching went into this piece as evident by the sashiko threading on the outside of the bag, and the boro textiles used for the exterior.
Made by https://www.byefrisbie.com/

Sashiko Exercise

Before starting on the stiches, I first took a piece of cut out denim from a denim jacket that I had cropped, as use that as the base for this exercise. I then used running stitches to sew two pieces of a knitted t-shirt onto the black fabric.

On another piece of white fabric that I had cut out from a t-shirt, I used that to practice my sashiko stitching before attempting the real thing. Whilte practicing, I found that I should make my stitches more even in size with each other and even in distance within one another.


Now onto finally attempting sashiko onto my sewn on fabric, I found some geometric patterns on Shutterstock and used chaco paper and the rolling tracer tool* to replicate the pattern onto my fabric. The reason why I decided to use geometric patterns despite the exercise already revolving around my topic of upcycling fabric, is because the geometric patterns are similar to clothing fibers when seen under a microscope as shown.


As I started on my sashiko, I found that it is quite difficult to stitch when the fabric is as hard to penetrate through like denim. I suffered many pokes through my skin as I was pulling the needle through the fabric, and my fingers were red and hurt for days. The pain was worth it though, as the end result was quite pretty. I've always wanted to know how these stitches were made anyway, and I was glad to have the opportunity to find out.
Final and Reflection on Sashiko:
Final result! I also decided to sashiko another piece of fabric that I stitched on at the side. I didn't like how it turned out halfway through though... as the stitches eventually became less equal in size. I left it as it is in the end, as I think that it would be a waste of my efforts if I were to unstitch everything. Trying the sashiko stitching technique was both calming and challenging. Each stitch needed to be uniform in size and spacing, which demanded steady hands and unwavering patience. It was a testament to the value of simplicity and precision in handcraft. The repetitive nature of Sashiko stitching was meditative, and it offered a serene and contemplative space for reflection, self-expression, and creative growth. I often found myself putting on a YouTube video to watch while I was sashiko stitching.

week 6
Embroidery & Appliqué

What is embroidery?
Embroidery is the craft of decorating fabric or other materials using a needle to apply thread or yarn. Embroidery may also incorporate other materials such as pearls, beads, quills, and sequins. In modern days, embroidery is usually seen on caps, hats, coats, overlays, blankets, dress shirts, denim, dresses, stockings, scarfs, and golf shirts.
Embroidery is available in a wide variety of thread or yarn colour. It is often used to personalize gifts or clothing items.
Some of the basic techniques or stitches of the earliest embroidery are chain stitch, buttonhole or blanket stitch, running stitch, satin stitch, and cross stitch. Those stitches remain the fundamental techniques of hand embroidery today.

Different types of embroidery stitches
1. French Knot
For many stitchers, making French knots remains a challenge. While it may take time to learn, it's worth the effort. Not only is this a common stitch to find in embroidery patterns, but it's also a good stitch to use when making a textured fill or other design elements.
This stitch involves wrapping the needle to form a knot on the surface of the fabric. The trick to making French knots is to hold the working thread taut, but not too tight.
2. Back stitch
Backstitch is so easy to learn that you'll have it down within the first few stitches. This basic stitch is likely to be the stitch you'll use the most. Backstitch is useful for any kind of outlining, but it's also a stitch that pairs well with other stitches, making it a key stitch to learn.
It's also easy to embellish with weaving or wrapping, and quickly transforms into the more decorative Pekinese stitch.
3. Chain stitch
If you want a bolder line of embroidery, then chain stitch is the stitch for you. Chain stitch forms a row of linked stitches that really stands out.
4. Stem stitch
Stem stitch is another basic stitch that's perfect for creating smooth outlines. It works well for both straight lines and curves, and despite its name, it isn't only for embroidering stems. Use a stem stitch on just about any lines in your stitching.
5. Satin stitch
One of the most classic embroidery stitches for filling an area is the basic satin stitch. There are a few variations, but at its essence, satin stitch is a series of straight stitches worked next to each other. The secret to making those straight stitches turn into something special is in practicing the length and proximity of the stitches.
6. Lazy Daisy
This stitch is often used to make petal shapes and small leaf patterns. It consists of a single loop of chain than a continuous pattern. Lazy daisy is one of the extremely easy stitches. This stitch need not be limited to just petals and leaves but can be used for more complicated designs.
7. Star stitch
The star stitch is a canvas embroidery stitch consisting of eight straight stitches, all worked into the same central mesh with their outer edges arranged together to form a star. The squares can be worked individually or in rows. This stitch is used in Hardanger work and drawn-thread work.


What is appliqué?
Appliqué is ornamental needlework in which pieces or patches of fabric in different shapes and patterns are sewn or stuck onto a larger piece to form a picture or pattern. It is commonly used as decoration, especially on garments. The technique is accomplished either by hand stitching or machine. Appliqué is commonly practised with textiles, but the term may be applied to similar techniques used on different materials. In the context of ceramics, for example, an appliqué is a separate piece of clay added to the primary work, generally for the purpose of decoration.
The term appliqué is derived from French and Latin verbs appliquer and applicare, respectively, which both mean to join or attach. Like embroidery, it has a humble beginning. The technique was used as a way to strengthen worn areas of items or to patch holes that had formed. Early appliqué was used to lengthen the life of clothing and moved into artful techniques that can be seen in blankets and quilts from numerous cultures from all over the world.
Embroidery and Appliqué Exercise

As my topic revolves around the usage of old fabric and its patterns, I searched up for inspiration on Google before starting on my embroidery and came across this image of an embroidered checkered pattern. I then decided to create my own version of it for my embroidery exercise.
I also made a mock up of what I would like my embroidery and appliqué piece to look like. The base is made by layering fabric atop one another, and the checkered pattern would be embroidered on top of it. Red ribbons would then be placed as decoration for the piece.


Applying the knowledge of appliqué, using a knitted sweater, denim, linen, knitted t-shirt, and rib knit. I layered them atop one another to form a sort of layered mountain landscape but in portrait mode, and I used bonding paper to attach these fabrics together without the need to sew.
Before embroidering the plaid pattern, I had to draw a few lines of my own to sashiko over so that I would have a guideline for my embroidery. Upon drawing on the lines, I realized that I didn't want to sew over all of them, so I settled on choosing lesser lines to embroider over.
Final and Reflection on Embroidery:
Embroidering a plaid pattern over appliqué fabrics was an intricate and creative endeavour that allowed me to explore the harmonious intersection of traditional handcrafts and contemporary design. Selecting the right plaid pattern and coordinating appliqué fabrics was the first challenge, and the combination of both allowed for a unique fusion of styles. Embroidering a plaid pattern demanded patience and a meticulous hand, which was why I had to reduce the difficulty and instead add more space in between the parallel embroidery. I also added red ribbons that I've had for the past year to the design as a statement piece, while also driving home my theme of reusing fabrics (upcycling). Choosing the appliqué fabrics was a creative process in itself. I wanted each fabric piece to complement the plaid pattern and create a harmonious visual effect. It was a lesson in understanding how different textures and colors interact with one another. This exercise expanded my skills in embroidery and textile arts, especially since I've been wanting to try out embroidery on my own, yet never found the time to start. It provided a deeper understanding of the importance of craftsmanship and how a combination of techniques can yield unique and visually striking results. This exercise has opened doors to further explorations of combining diverse techniques and materials in art, and I look forward to experiment with different patterns and textile combinations to continue pushing the boundaries of creativity, maybe not just in fashion but also other mediums of art.

Week 7

Plastics
Obsesssion of Plastic Usage in the Fashion Industry
The fashion industry has an addiction to plastic – and it’s casting a long shadow on the health of our planet. Each year, the industry uses 342 million barrels of petroleum to produce plastic-based fibres such as polyester, nylon or acrylic. This equates to 1.35 per cent of the globe’s oil consumption.
Worse still, these plastic-based fibres are responsible for 73 per cent of microfibre pollution in Arctic waters and, according to the Ellen MacArthur Foundation, the plastic packaging on which the fashion industry is largely reliant, is estimated to make up 26 per cent of the total volume of plastics created each year – 72 per cent of which is thrown away. However you choose to measure its impact, the numbers are staggering.
Most fashion brands are now producing almost twice the volume of clothing they produced in 2000, with most of that growth coming from clothes made using plastic-based fibres. Only a tiny proportion of these fabrics are ever recycled, with the vast majority of our clothing ending up in landfill or being shipped to countries in the developing world. It’s clear that as the amount of clothing being produced each year increases, so too does the size of the fashion industry’s plastic problem and plastic waste.
How is Plastic Used in Fashion?
When environmental scientists noticed polyester, a primary component of fabrics such as fleece, was the most common type of microfiber found in the environment, they began investigating how and why textiles were shedding so many microfibers. The 2017 Ellen MacArthur Foundation report, A New Textiles Economy: Redesigning Fashion’s Future, pointed out how in recent decades the fast fashion sector ramped up demand for plastic-infused clothes with “quicker turnaround of new styles, increased number of collections per year, and lower prices.”
Fast fashion relies on enormous virgin plastic production to enable growth; the report estimates that 63 percent of the materials used for clothing in 2015 were virgin plastic compared to less than 3 percent being recycled material.
Clothes – especially fast fashion – are made of these cheap plastic materials. While wearing or washing, these clothes shed tiny plastic particles that end up in the environment, in animals and even in our bodies.


With the restricted amount of plastics I brought, I decided to create a bag out of them. I thought of the various options and with what I've got, I decided on creating a tote bag. When preparing the tote bag, I laid the plastic apron flat on a clean, flat surface. I brainstormed on the size of my tote bag, and decided that the size of my bag would be half the size of my apron. As my apron was essentially rectangular but with a hollowed circle at the top, I simply attached two aprons together and folded them up to the top.
I then ironed the plastic apron at the sides and the hem, to ensure that whatever I put inside the bag wouldn't fall out of any holes. When the tote bag was done, I realized that it was a bit too plain, of course due to it being white and without any branding. I had a piece of orange Art Friend plastic laying around and cut out a rectangular size out of it, with the branding on the plastic. I then ironed the orange plastic onto my tote bag, and the end result looked like a limited piece of merchandise from Art Friend itself.


Reflection on Plastics
The experience of making a plastic tote bag from a plastic apron was an intriguing and innovative endeavor that challenged my preconceived notions of materials, creativity, and sustainability. Working with plastic materials, especially repurposing a plastic apron, was a fresh perspective on sustainability and it forced me to confront the issue of plastic waste head-on, and provided an opportunity to contribute to a more sustainable future. The process of reusing a plastic apron as the primary material emphasized the importance of repurposing and recycling in our daily lives. Selecting a design that would make the most of the plastic apron material was a creative challenge as I had to consider the texture and durability of the plastic. The process of ironing the plastic apron into a tote bag required multiple testing. I've never ironed plastic before out of fear for burning through it and it was imperative to avoid overheating the material. It was a valuable lesson in thinking outside the box and adapting to the unique properties of plastic. This exercise advanced my mindset regarding sustainability, as it highlighted the potential of repurposing materials we often discard without a second thought. It made me question the disposability of everyday objects and inspired me to seek out opportunities to upcycle and repurpose in other aspects of my life that isn't relating to fashion. The completed plastic tote bag was not only a creative achievement but also a functional item with a positive environmental impact. Should I redo the tote bag with an improved design and actually use it while out and baout, I think it would serve as a conversation piece, allowing me to explain the concept of upcycling to others and promote the idea of reusing materials.


week 9 & 10
Batik
What is batik?
Batik is an Indonesian technique of wax-resist dyeing applied to the whole cloth. This technique originated from the island of Java, Indonesia. Batik is made either by drawing dots and lines of wax with a spouted tool called a canting, or by printing the wax with a copper stamp called a cap.
The applied wax resists dyes and therefore allows the artisan to colour selectively by soaking the cloth in one colour, removing the wax with boiling water, and repeating if multiple colours are desired.

Batik is an ancient art form of Indonesia made with wax resistant dye on fabrics. Indonesian coastal batik (batik pesisir) made in the island of Java has a history of acculturation, a mixture of native and foreign cultures. It is a newer model compared to inland batik, and it uses more colors, though the patterns are less intricate. This is because inland batik used to be made by select experts living in palace areas, while coastal batik can be made by anyone.
Batik is very important to Indonesians and many people wear it to formal or casual events, they are commonly used by Indonesians in various rituals, ceremonies, traditions, celebrations, and even in daily uses.
Origin of Batik
The word batik is Javanese in origin. The word bathikan also means "drawing" or "writing" in Javanese. When the word is absorbed to Indonesian, the "th-" sound is reduced to a "t-" sound more pronounceable to non-Javanese speakers.
The word batik is first recorded in English in the Encyclopædia Britannica of 1880, in which it is spelled as battik. It is attested in the Indonesian Archipelago during the Dutch colonial period in various forms such as mbatik, mbatek, batik and batek. Batik known as euyeuk in Sundanese, cloth can be processed into a form of batik by a pangeyeuk (batik maker).
Batik is an ancient fabric wax-resist dyeing tradition of Java, Indonesia. The art of batik is most highly developed and some of the best batiks in the world still made there. In Java, all the materials for the process are readily available—cotton and beeswax and plants from which different vegetable dyes are made.

What is the wax used in batik?
Batik wax is a combination of paraffin, beeswax, and resin. It is a translucent yellow when it is fresh, but may look dark brown or black after many reuses. The artisan retraces the design on the cloth with wax using the canting. Some areas are then filled in with decorative detail, known as isen-isen.

The wax can be applied with a variety of tools. A pen-like instrument called a canting (Javanese pronunciation: tjanting, sometimes spelled with old Dutch orthography (tjanting) is the most common. A tjanting is made from a small copper reservoir with a spout on a wooden handle. The reservoir holds the resist which flows through the spout, creating dots and lines as it moves. For larger patterns, a stiff brush may be used.
My take on batik


Fig. 1
Before starting on the actual batik print, we practiced handling the tjanting tool. I've actually done batik a few times as a sort of exercise for Malay students back when I was in Secondary 1 or 2, so using the tjanting tool to form patterns is not foreign to me. Even back then, I struggled in holding the tool while ensuring that the wax that flowed from it would create a proper floral pattern without making too much mess.
When I encountered the tjanting tool again this time round for the batik exercise, I at least knew to be quick in drawing my patterns. The patterns I chose to draw onto my batik print were geometric shapes to replicate what fabric fibers look like under a microscope. I was fast in drawing these shapes, though of course they were easy enough to draw considering they are just lines, but they needed to be drawn such that the wax would pass through the other side of our fabric and also to ensure that our lines are closed so that our coloured dye will not seep through past that particular line.


Fig. 2
After practicing with the tjanting tool using the old and new batik wax, I decided to use the new wax as shown on Fig. 2. Reason being, the wax looks cleaner and I didn't want to risk the old wax leaving a mark due to the dark nature of it.


In preparation for the final batik print, I sketched out my geometric patterns onto the cotton fabric. I left a big area empty to be filled with wax just so that I could break them apart to form fine lines in between with coloured dye.


_JPG.jpg)
I also decided to create a second geometric batik print, but this time without any large parts of wax to break.
Adding in liquid dye in accordance to my colour palette from my theme's moodboard, reds, blues, beige (in the wax). Unfortunately I was unable to create black, so I settled with greys.
_JPG.jpg)
Followed the colours in reference to my colour palette from my chosen theme of upcycling fabrics. As mentioend, I left a chuck of space to pour wax on it for the purpose of breaking apart the wax to smear liquid dye in the cracks of the wax to form fine lines that much closer resemble what fabric fibers look like under a microscope.

Batik wax removal techniques
1. The Hot Iron & Paper Technique
- This was the preferred way to remove wax from batiks, especially for wall hangings back in the 1970s
- With the hot iron and paper technique you sandwich your finished batik project in between layers of brown paper (or packing paper, newsprint, etc.). Then you go over the paper with a very warm iron.
2. Taking it to the Dry Cleaners
- Not recommended as some dry cleaners will still take your wax-covered things and use powerful chemicals like paint thinner to remove them from the fibers. Downsides to this method include yucky chemicals, it costs a lot of money, it’s bad for the people who have to do it for you, and it can be stinky.
3. Boiling (as shown in the video to the left)
This method has many upsides:
-
It completely removes the wax out of your fabric (as long as the fabric is not synthetic), so you get a very soft, wax-free finished project.
-
It allows you to re-use your wax, which is great for your wallet and great for the planet, especially if you’re using pure beeswax.
-
You can use the same water again and again until it’s too dark to see through anymore, thereby saving water.
-
You can boil & boil again if you don’t get a complete boil-out the first time.


Time to finalise the batik print! I went with the hot iron and paper technique as I've done it before. As mentioned, I've done batik when I was in my Lower Secondary days
Final and Reflection on Batik:
Choosing the right geometric pattern was the initial challenge. I wanted a design that was visually appealing while also reflecting my theme of reusing fabrics. Applying the wax to fabric was a delicate process, and I soon realized that achieving precision in my design was far from easy as it was meticulous and time-consuming that required patience and a steady hand. Having patience was one of the most valuable lessons from this project, with the other being the importance of precision when applying the batik wax using the tjanting tool. Dyeing the fabric too required me to ensure that it didn't seep through the lines. Crafting this batik print deepened my appreciation for the rich cultural traditions behind this art form. It was a reminder of the importance of preserving and celebrating traditional crafts, especially as a Malay person and having been exposed to numerous batik prints and clothing.


week 10, 11, & 12
Group Project
GROUP PROJECT WITH JOVI
Sustainable artifact
What are we making:
- Apron
- Utility belt
Techniques to use:
- Sashiko/boro
- Tie-dye
- Embroidery
Things to note:
Avoid spending money on this assignment (don’t buy fabric and any other material, just use what’s already available/take from other garments)
Product idea:
The tailor tool roll apron is a utility garment that can be served in both fashionable and functional way
Fabric to use:
- Non-clothing textiles (cause it is sustainable to use fabrics that are already used)
- Upcycled fabrics from actual garments (also because it is sustainable)
Image References


Discussion
Jovi and I discussed on whether or not we should make the smaller apron, or the larger one, when we got the idea that we could each do one apron so that we can bring them home for our own usage. We decided on Jovi making the smaller the apron with its main position being at the front of the waist, and I will do the longer apron that's meant to be worn at the side.
Additionally, although they have their own positions as mentioned, we made it so that they are able to placed anywhere around the waist. We also decided that both our aprons should be combined such that they would form an asymmetrical skirt. We distributed who would do what technique, and we started on our group project from there.
Sketch
Before starting on the apron, I thought it would serve me well to create a sketch of it and how many pockets to place on the apron, so that I'd have an idea of the placement.
As for the base, I was thinking of having it be made of denim boro-sashiko for it's stability and roughness.

Measurements


Strap Measurements
Width: 2cm
Length: 200cm
Apron Measurements
Length down: 85cm (including strap folds and before seam allowance)
Width: 45cm (before seam allowance)
Apron Measurements after Seam Allowance
Length down: 99cm
Width: 49cm
Digital rendition of the final pattern for my apron.


After the sketch, Jovi and I decided to make mock-ups out of leftover calico of our design so that we could see what are the changes that we should make and what (if any) part of our stitching should we keep.
Regardless of the simplicity of our aprons, we still wanted to create mock-ups anyway so that we may brood over pieces that we would want to add.


Pictures of my part of the mock-up on body.
Sourcing for fabric
As we wanted to use old fabrics from garments that we already have, I found out that I may not have many unused fabric that's rigid and tough enough to withstand the various tools that people use a utility apron for, so I also asked a few friends around if they had any fabric laying around that they wouldn't mind handing over to us for this project.
Eventually, my friend from the 3D domain said that she has designer tweed that she won't use and gave quite a massive stack of them to us. When we received the fabric though, it changed the entire game for us.
We decided that we should not have a denim base anymore, and instead use these tweed fabrics as our apron.


Jovi also brought to class a variety of denim skirts and shorts for us to cut out fabric from. We then got the idea to just unpick the pockets and use them for our utility aprons instead of making the pockets from scratch. I managed to unpick 6 pockets from three denim bottom, and set them aside for usage.

Option 1

Option 2
Before we starting sewing on our final product, I laid out the fabrics in class to view my options on how I would want my part of our apron to look like. Above are my options for the apron.


After deciding on the placement of the tweed fabric, I started sewing right after to quickly finish the apron so that we'd have time to complete the rest of it.


I also sewed a piece of stretchy denim fabric together for the stationary and tool holder.

As Jovi and I decided to incorporate sashiko into our project, I decided to do running stitches across the cut out denim pockets that I took out from her old jeans. Doing these was actually quite therapeutic, and I didn't expect to do all three of them within a span of a few hours.
As shown in previous pictures above, I managed to stitch the tweed fabric together to form one big rectangular base for the utility apron. Unfortunately though, I realised that the white thread that I used to contrast against the fabric wasn't stitched neatly.
To combat the appearance of uneven stitches, I decided to embroider over them using chains stitches. I didn't want the embroidery to be seen on the wrong side of the apron, so I embroidered between the tweed yarns.
Attached are pictures of the apron try-on to view how to shape looks like on body.


Continuous embroidery on the apron stitchings.


Sewing the top of the apron to secure the belt buckle, side seams, and the hem. Because the tweed fabric made the cloth very thick to sew, I had to do this step slowly and steadily to prevent the needle from breaking. I was surprised to find that after awhile though, it was quite easy to sew through the thickness.

Laying out my pieces of denim pockets and other fabrics before sewing to see how they look like.


Sewing the strip of fabric as the stationary and tool holder onto the apron.


Sewing on the pockets onto the tweed apron. I followed the stitch lines from the previous stitch that I unpicked, so it was easier to sew the pockets. The only challenge was to ensure that the sewing is neat and even, and it seems that I still need to practice on my sewing often to be more confident.


After I finished sewing the pockets, I realised that the colours are a bit dull. I asked Jovi for her opinion and she suggested that I add a bit of beige to brighten the overall colour scheme. I found a few beige fabrics and added them onto the apron for decoration and a pop of colour.

Final product! At least for my part of the project. Overall I quite like how it looks and how functional the pockets and tool holder, and how the colours come together. The texture of the tweed too contrasts with the smoothness of the denim pockets.
I think I made the right decision in embroidering over my initial threads that are keeping the tweed together, as the white thread also contrasts against the dark colours of the tweed base.
If I were to remake this apron though, I would ensure that the pockets are stitched straight parallel against the side seams. Unfortunately the pockets were already uneven to begin with, so try as I might, I couldn't stitch them without having them be crooked.

Front view // Apron placed to the wearers left.

Front view // Apron placed to the wearers front.

Side view // Apron placed to the wearers right.

Placing Jovi's apron with mine to form an asymmetrical skirt.

We added a bunch of stationery and tools to check the functions of our pockets and how they withstand multiple items.


Reflection on our Group Project:
Our project aimed to upcycle old textiles into functional but also stylish utility aprons, while also putting into use any of the textile methods that we've learned. We selected this idea as not only was it sustainable, it was also fairly simple to sketch out and create with our given time frame of 2 weeks, and Jovi and I agreed to use my initial textile topic of upcycling fabrics. Throughout the project, Jovi and I collaborated effectively by brainstorming ideas and sketching designs, and making sure we were on the same page regarding our vision with the mentioned utility aprons, given that we decided to do one apron each so that we would be able to combine them to form an asymmetrical skirt.
Challenges are inherent in any project, and our upcycled apron project was no exception. The most significant challenge we faced was finding suitable materials to upcycle. We had to ask multiple of our friends from other domains, and from outside NAFA, if they had any unused fabric or apparel. Eventually, we got multiple donations, namely the designer Raf Simons tweed that we used as our base for the apron, which was given from a friend I made from 3D Domain. This project allowed us to hone our sewing skills and patience when sewing through thick fabrics. We both also deepened our knowledge of sustainable practices, appreciating the value of repurposing old items instead of discarding them.
In the end, we successfully created unique and stylish aprons from unused tweed samples that would have otherwise gone to waste. Our upcycled aprons not only looked good but also carried a story, adding a personal touch to both pieces. This project allowed us to appreciate the beauty in imperfections and the satisfaction of creating something with our own hands. Effective communication was a cornerstone of our successful collaboration. We regularly shared ideas, progress updates, and constructive feedback. If we disagreed on design choices or encountered issues during construction, we approached these discussions with respect for each other's opinions. This open communication facilitated creative problem-solving and ensured that we were both satisfied with the final product. Working on this upcycled utility apron-turned-skirt project was a rewarding experience that showcased the power of creativity and sustainable practices. It also highlights the importance of effective collaboration and open communication in a group project, which is necessary in the advancing world.
Year 1, Semester 2 week 1
Marbling
What is marbling?
Marbling is the art of printing multi-colored swirled or stone-like patterns on paper or fabric. The patterns are formed by first floating the colors on the surface of a liquid, and then laying the paper or fabric onto the colors to absorb them. Marbling is sometimes still called by its original Turkish name, ebru.
Marbling originated in Japan in around the twelfth century. Some believe it was discovered by accident by someone in the Japanese imperial family who submerged sumi ink paintings in water, watched the inks float to the surface, then put a piece of paper on the floating ink, lifted it up and preserved the image. This technique was termed Suminagashi, or "ink floating."
During the sixteenth and seventeenth centuries marbling spread to Europe, but the trade secrets were kept that way by only a handful of people. They named patterns after their countries: i.e., Old Dutch, French Curl, and Italian Hair Vein, which are still used today. Apprentice marblers were taught only one step of the marbling process, and some were actually forced to work behind wooden partitions to keep the other workers hidden. Most marbling was used for decorative bookbinding.
Marbling Methods


1. Ink Marbling
To create very light marbling effects, using ink is a good option. This technique creates a soft light marbling that you can easily draw over, write a letter on, or make calligraphy over.
For best effects, thicken the water before dropping your ink on top of it. Gently drop the ink, and then swirl either by fanning or with some kind of spoon. Work gently. Since ink is likely to flow and run, too much disturbance may simply dye the paper rather than marbling it, so be careful not to overmix.


2. Nail Polish Marbling
Nail polish marbling is a good option for marbling on different surfaces and substrates since it tends to be more permanent than other home marbling methods. The nail polish method does tend to have a distinctive smell, however, and it requires adult supervision.
Most nail polish will float on water automatically, but the key is to work quickly and finish your marbling before it does sink to the bottom. When you’re ready, gently press the item that you want to marble into the nail polish, then remove it and allow it to dry.


3. Spray Paint Marbling
Marble large sheets of paper with eyepopping colors by using spray paint. This is also a good way of adding some vibrant metallic colors, such as gold and silver into your marbling. Since spray paint has a strong odor, make sure to work outside or in a well-ventilated area.
With this technique, it’s best to work rapidly. Apply the spray paints to the surface of the water for marbling. Then, stir or arrange the colors. Quickly apply the paper to the surface and remove it.


4. Oil Paint Marbling
Oil paint marbling is one of your best options for creating a vibrant marbled artwork. Not only do the colors remain vibrant, but the oil paints also give you the most control over the design or image. Keep in mind, however, that since oil paint will remain on the surface of the paper, you may not have as much freedom to draw or paint over the design.
This technique requires genuine oil paints and thickened water. Make sure to do some tests before beginning. Since oil paint can be dense, your testing should make sure that the pigments float on top of the water. Dilute the paint to the point that it’s still thick enough to be vibrant but not so thick that you can’t drop of blend the colors. Then use tools to stir and shape the colors how you want them.


My Take on Marbling


My first marbling attempt, I used the Marabu Easy Marble ink to mimic the random lines, shapes, and sizes that represent fabric when shown under a microscope, as shown in Figure 1B. I don't think that this attempt shows what I want to convey, because as compared to the image shown beneath it, there are no parts of it that resembles fabric strings. As for the colours, I used similar colours shown in my moodboard, blues, reds, black & greys.
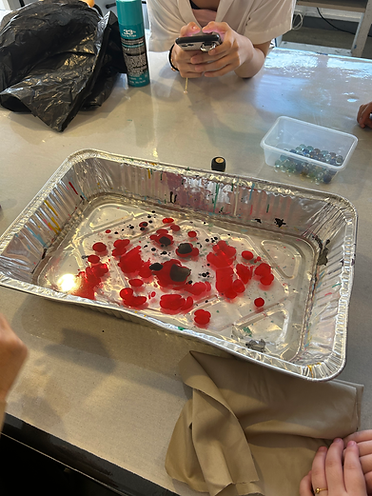
5. Food Colouring and Shaving Cream Marbling
This technique is as simple as swirling the food coloring into a layer of shaving cream, creating the design you like, and then press the paper down onto the layer of shaving cream, evening it out as you go. And then scraping off the shaving cream once you remove the paper.
Fig. 1A
Fig. 1B
Scanning electron micrographs of the various fabric types used in the experiment: car seat cover material (100% polyester) (A), plain woven cotton (100% Egyptian cotton) (B), denim (100% cotton) (C), and fleece (100% polyester) (D)


Second marbling attempt, made using men's shaving cream as the base for the ink to sit on. Again, I was attempting to emulate fabric when viewed under a microscope, and I think in terms of the shapes that this attempt formed, it did a better job than the previous one.

Third marbling attempt, also made using men's shaving cream. Unfortunately, I did not swirl the ink enough, nor did I add more, alas the final print looks like a smudge rather than deliberate lines.

Fourth marbling attempt, using the Marabu ink. This was my least favourite piece out of all the prints, solely because of the dull colours that ended up on the fabric. This print also did not convey my theme of viewing lines at all, thus this attempt was a fail. I think if I had to do this all over again, I would add more drops of colour and swirled them around even more, I could also maybe add more black to balance it out.


Fifth marbling attempt, using boiled cornstarch as the ink base. Using cornstarch was an interesting experience, but I prefer the result of swirling the ink onto the cornstarch base, rather than when I placed a sheet of fabric over it to transfer onto the fabric. When transferred, the watery effect and smudges did not look as well as it did when it was in the white tray, and my topic shone through better before.
Marbling as shown in fashion


Marbling in architecture


Reflection on Marbling:
Year 1, Semester 2 week 2 & 3
Laser Cut &
Engraving
Lasers have been used in apparel industry from nineteenth century for various garment manufacturing applications. There are several advantages of using laser over the conventional processes in cutting, engraving, embossing, denim fading and other applications. In addition, product damage potential is reduced, no/less consumables are needed and no problem of toxic by-product disposal as found in some processes. Today’s laser equipment is a result of continuous research and development of earlier products, which has undergone several changes.
However, the modern laser systems are simpler in operation and maintenance. Furthermore, the earlier systems were involved with more safety issues and needed the gasses to be constantly replenished. The garment manufactures around the globe should take the advantage of laser application in the post multi-fibre agreement regime to make their products more competitive.
History of laser cutting
Laser is being used in apparel industry from ninenteenth century. Recently the use of laser in apparel industry is increasing in cutting garment patterns, patterning designer neckties, 3D body scanning, denim fading and engraving leather.
The major reasons for wide application of laser in garment industries may be due to reduced cost, flexibility and anti-counterfeiting. For example the artwork of high-end necktie producers are digitally stored rather than physical patterns to lower the theft risk. When needed, the digital patterns are converted into physical samples using lasers.
Recently, the application of laser in denim engraving is increasing rapidly for value addition by replacing the traditional denim-distressing technics, which will take the denim segment to a height of sophistication that can never be realised by non-laser methods.
My Take on Laser Cutting


The pattern of fabric under microscope I'm trying to imitate
The original idea


In order to better simulate the messy look of fabric when viewed under a microscope, the original idea was broken down into three layers on Illustrator, while changing the sizes of the rectangles to vary in size so that they would appear more random when all layers are put together
Final result


In order to better simulate the messy look of fabric when viewed under a microscope, the original idea was broken down into three layers on Illustrator, while changing the sizes of the rectangles to vary in size so that they would appear more random when all layers are put together. I quite like the final result, however I think the effect could be further enhanced if I had used different coloured organza for every layer, from light to dark. I could have also thinned the rectangles and added more sporadically around the fabric, but was afraid of tearing the organza.
For the final final product, I added a layer of light blue organza to combat the same colours used throughout, and to see if having different colours would look different. As mentioned previously, I should have made the rectangles thinner instead so that the overall print would look even closer to my vision of fabric when viewed under a microscope. I thought that wrinkling and stretching the fabric would help with making the final look messy, but I think that effect would be better achieved should the colours be different.

Year 1, Semester 2 week 4 to 10
Weaving
What is Weaving?
Weaving is the textile art in which two distinct sets of yarns or threads - called the warp and weft - are interlaced with each other at right angles to form a fabric or cloth.
The warp threads run length-ways on the piece of cloth, while the weft runs horizontally. Cloth is woven on a loom, a device for holding the warp threads in place while the weft threads are woven through them, back and forth. Weft is an old English word meaning "that which is woven". Woven cloth can be plain (in one color or a simple pattern), or it can be woven in decorative or artistic designs.
Group work with Keane:
The sketch and initial idea

Initially, we wanted to weave a scarf, but thought that we should create something we would actually use, so we had the idea to weave a small bag to hold essentials like a phone, wallet, keys, earbuds. When approaching the colours, we went for a combination that would suit both of our aesthetics, and so we chose black, greys and white, and a splash of red for a pop of colour.
Keane suggested we add carabiners onto the bag, and I was on the fence with the idea until he showed me a rough sketch (as shown in the left pic) of what the final product would look like.
The red lines were to be made with embroidery thread, and they are supposed to represent my topic of having lines going in random directions.
With this idea in mind, we bought about 12 carabiners from Daiso, and black, white, light grey, and dark grey yarn from Spotlight, and set to work.
Process


We decided on doing contrasting bases, so I start with a white yarn base, while Keane has a black yarn base, and so we set off to weave nearly identical patterns onto our bag.
We wove at the same time and pace so as to ensure that we were both on the same number of yarn to weave through, and to ensure that they both look as similarly to one another as much as possible.
final outcome


Mine (left), Keane's (right)
By the end of Week 10, we had finally finished our matching woven bags.
How I would style our bag


1
2

3
With the final outcome of our bag, I envisioned a specific aesthetic suitable for the bag. Though of course anyone with different aesthetics could style our bag, I think something a bit more edgy would be a better fit. Thus, I styled the bag with three black and white outfits and accessories that I think go well together.
Year 1, Semester 2 week 5
Smocking
Smocking is an embroidery technique used to gather fabric so that it can stretch. Before elastic, smocking was commonly used in cuffs, bodices, and necklines in garments where buttons were undesirable.
Smocking developed in England and has been practised since the Middle Ages and is unusual among embroidery methods in that it was often worn by laborers. Other major embroidery styles are purely decorative and represented status symbols. Smocking requires lightweight fabric with a stable weave that gathers well. Cotton and silk are typical fiber choices, often in lawn or voile.

Smocking is worked on a crewel embroidery needle in cotton or silk thread and normally requires three times the width of initial material as the finished item will have. Historically, smocking was also worked in piqué, crepe de Chine, and cashmere. Fabric can be gathered into pleats in a variety of ways. Early smocking, or gauging, was done by hand. Some embroiderers also made their own guides using cardboard and an embroidery marking pencil.
Smocking is done before a garment is assembled. It usually involves reducing the dimensions of a piece of fabric to one-third of its original width, although changes are sometimes lesser with thick fabrics. Individual smocking stitches also vary considerably in tightness, so embroiderers usually work a sampler for practice and reference when they begin to learn smocking. Traditional hand smocking begins with marking smocking dots in a grid pattern on the wrong side of the fabric and gathering it with temporary running stitches.
These stitches are anchored on each end in a manner that facilitates later removal and are analogous to basting stitches. Then a row of cable stitching stabilises the top and bottom of the working area. Smocking may be done in many sophisticated patterns.


Year 1, Semester 2 week 7, 8, 9
Screenprinting
Screen printing is the process of pressing ink through a stencilled mesh screen to create a printed design. It’s a popular technique used in a whole range of different industries, so even if you've never heard of the term before today, it’s likely that you’ve worn or used a screen-printed product at some point without even realising. The process is sometimes called serigraphy or silk screen printing, but all of these names refer to the same basic method.
Screen printing is an effective technique for creating bold canvases, posters and artwork, but the method can also be used to print fabrics and textiles, so it's great for creating all sorts of custom clothing and products.
Screen printing is the process of transferring a stencilled design onto a flat surface using a mesh screen, ink and a squeegee. Fabric and paper are the most commonly screen-printed surfaces, but with specialised inks it’s also possible to print onto wood, metal, plastic, and even glass. The basic method involves creating a stencil on a fine mesh screen, and then pushing ink (or paint, in the case of artwork and posters) through to create an imprint of your design on the surface beneath.
The process is sometimes called 'silk screening' or 'silk screen printing' and while the actual printing process is always fairly similar, the way the stencil is created can vary, depending on the materials used. Different stencilling techniques include:
-
Using masking tape or vinyl to cover the desired areas of the screen.
-
Painting the stencil onto the mesh using 'screen blockers' such as glue or lacquer.
-
Using a light-sensitive emulsion to create a stencil, which is then developed in a similar way to a photograph.
Designs made using the screen printing technique may use just one shade of ink, or several. In the case of multicoloured items, the colours must be applied in individual layers, using separate stencils for each ink.


drawing & making a (textiles)
YEAR 1 SEMESTER 1
week 1
Drawing/Direct Mark Making
Mark making can be done using found nature objects, home items, and any other kind of object that isn't your typical paintbrush, to develop drawings with mark making techniques to produce design motifs.
It also describes the different lines, dots, marks, patterns, and textures we create in an artwork. It can be either loose, gestural, controlled and neat.
It can apply to any material used on any surface: paint on canvas, ink or pencil on paper, a scratched mark on plaster, a digital paint tool on a screen, and etcetera.
In our case, I used Chinese ink bought from Daiso and watercolour paper, and used a selection of other materials both natural and everyday items to dip into the ink.
For most of the paper used, I had no motifs or any sort of idea on the kind of patterns that I wanted to make, so I was really just playing around with the concept of mark making and trying my best to make the marks look coherent. As time went by and I created more paintings, I had the idea to paint fire and smoke to simulate the burning of excess clothing caused by major fast-fashion companies such as Shein, H&M, Zara, and etc.
Research
Somewhere along the line of making random strokes on paper, I had the idea of basing my topic of sustainability around the burning of textiles/clothing due to over production by fast fashion brands such as H&M and Shein. I researched on artwork that were similar to my line of thought and tried to imitate their strokes with the materials that I had.
Painted by Jacqueline Tam, who is an illustrator based in Brooklyn, New York. She holds an MFA from the School of Visual Arts in Illustration and has worked on editorial, advertising, packaging, book, and fine art commissions. Movement and emotion are consistent themes in her work and she often draws inspiration from the natural world to represent our shared and intangible human experiences.
When a wash of ink spreads across the paper in an unanticipated way, we can become the creator of an exquisitely made mark. This kind of encounter can often happen when we approach a sketchbook with an attitude of play—with a new tool or a new way of moving the hand across the surface of the paper. Stamping with ink, drawing with a comb, and painting on yupo paper were used to experiment and created to form unique and unexpected textures such as the image shown on the right.
Jacqueline Tam, 2023
Where the Ocean Meets the Sky by Lawrence Terry
Photo by Timothy Hill
Next, is an artist who uses actual smoke in his artwork. Lawrence Terry has discovered a way to harness its power and predictable (if potentially dangerous) qualities. His mark making techniques involve manipulating fire and smoke to create abstract, mixed-media art that is “built.”
Introduced to fire in a Raku ceramics class and a welding class during the same semester at Louisville School of Art in the 70s, a few years later he had a candle burning and started playing with the smoke and a piece of paper to explore the carbon effect and the rest is history.
The burning is mechanical. Lawrence uses a torch, which produces hues in the sepia family. Using a candle flame, the smoking is more organic. The candle flame produces colors in the carbon family that range from deep black to whispers of grey, which is more cloud-like. Line carving is done with various tools, including a Dremel.
My Take on Mark Making and the Materials used
Toothbrush
Facial Brush
Crumpled wrapping paper
Yarn
Leaves taken from the ground
Plastic glove
Artificial leaves and flowers
Straws
Chinese Ink
Results of mark making (in no particular order):
The first piece made. Just as a way to test out what shapes/silhouettes do my materials make, I used as many as possible to create this artwork of leaves, using the rough side of the plastic glove, brush to elongate certain lines and to complete shapes, facial cleanser brush to form multiple brush strokes at once.
Made with no intent. Using the rough side of the plastic glove to create the spotty texture, toothbrush bristles to stroke across the paper, and my own hand to form the blotches of ink.
Another random piece of testing out the shapes made using the tips of the facial cleanser brush, the end of a straw, artificial leaves, and moving my hands in different directions.
At this point, I had the idea of revolving my theme around air pollution caused by textile factories and the burning of excess clothes, so I painted smoke and fire using the bristles of the facial cleansing brush.
Same idea as the previous painting, but in landscape. The 'smoke' effect was created using light strokes of the facial cleanser brush. The leaf silhouettes above the flames were added in a way that resembles making the fires grow larger.
Thin strokes were made using toothbrush bristles, spots shown on paper formed by sprinkling bits of ink using my fingertips.
Reflection on Mark Making:
This activity takes me back to when I was younger, as I've done mark making before but with scrap food, like orange peels, uncooked pasta (macaroni, spaghetti), and more. Doing this as on the first week (and first day) of school was much more exciting as I got to use my hands for something that isn't hunched over and drawing away with my tablet at my laptop. It was hard to compose a piece that held meaning as I was mainly testing out the kinds of shapes and textures that my materials would bring, and when I finally thought of a topic to base my mark making out of, it was taxing to recreate smoke out of solid objects. But, by having one idea rejected, more ideas would shine through. Exploring the art of mark making with black ink was a transformative and liberating journey into the world of abstract expression and creativity. Beginning the project was an open canvas, both figuratively and literally. The sheer freedom and lack of constraints in mark making were simultaneously exhilarating and intimidating. It felt like a journey into the uncharted territories of my imagination, as I was restrained by using only the materials I had on hand. But I enjoyed the process of trial and error to see what topic works for me for future exercises.
Mood board
Topic: in relation to sustainability
After we were done with our mark making, we were tasked with creating a textile mood board to base our next textile exercises on, which is obviously about sustainability. This was a real challenge for all of us because as compared to something like architecture, where you could grab it's patterns from the buildings directly, it's tough to think of patterns/motifs that would properly describe the chosen sustainability topic.
Before I chose the actual topic that I wanted to work on, I made three different moodboards with their own mind maps as shown:
1. Air Pollution
As mentioned previously, I had the idea of choosing the topic of burning clothes due to overproduction, thus causing air pollution, though the more I thought about it, the more I realise it would be quite difficult to form patterns to describe air pollution. I still made the moodboard anyway to see if it would inspire more ideas within me, but unfortunately I couldn't come up with anything tangible, thus this idea was scrapped.
2. Lack of human rights in clothing factories
After the failure that was air pollution, the reality of the lack of human rights within fast fashion factories came to mind. But then again, the more I tried incorporating it's patterns into the textiles is when I hit a roadblock of ideas.
Thus, this was scrapped.
3. Recycling fabric from old garments to be made into something new
Mindmap
Finally, after two failed ideas, I came up with the thought of my topic being about upcycling clothing, so that my textures and patterns would imitate those of textiles such as plaid patterns, the feel of corduroy, and more. My chosen topic also matches with the theme of sustainability, as upcycling clothing reduces buying more apparels and designing different ways to wear existing clothing.
Included is a mind map of reworked fashion:
- Often made with different fabrics/patterns/textures which has been used before
- Buying vintage clothes/thrifting used apparel to remake them into something new or combine them with one another
- Inspired by the various textures & patterns that make up something new
- Sustainable to the environment as no fabric is wasted, for example, multiple vintage shirts make up patchwork tops/bottoms, or not stopping at just clothing but also any type of fabric including from bags
I was also advised to branch out into recycled fibres or leftover food to add more patterns into the motifs.
What is upcycled clothing?
Upcycling (sometimes known as creative reuse) means repurposing old, disused, broken and unloved items into something that provides value again. Essentially, it's about turning trash into treasure. It can refer to objects or waste materials that would otherwise be destined for landfill.
Examples of upcycled clothing as shown:
Denim patchwork jacket
Shirt made of different patterns
Dress made of what looks to be a rice sack with embroidery by Maison Martin Margiela Haute Couture Fall 2015
Brands that have produced upcycled clothing
Maison Margiela
Maison Margiela autumn/winter 2020. From project 'Reclica', it is a nifty portmanteau that fuses ‘recycle’ and ‘replica’—builds on the house’s Replica line conceived by Margiela and is Galliano’s exploration of transforming vintage clothing into very new, very now pieces for a current season.
Louis Vouitton
Louis Vuitton Spring - Summer 2021. Presented through the childlike grammar of fantasy, Men’s Artistic Director Virgil Abloh seeks to de-programme our minds from the images of obsolescence that lead to overload, overproduction and waste.” Thirty looks are made from new material, 25 are from materials recycled from the atelier’s previous collections, and 25 are looks from the previous collection.
Emporio Armani
Emporio Armani’s new R-EA capsule collection for men and women uses recycled, regenerated or organic materials. In these eco-woke times, wear your eco credentials on your clothes and spread the sustainable fashion message far and wide when you go out and about. Many of the pieces from the R-EA (Recycled Emporio Armani) collection comes emblazoned with the bold writing “I’M SAYING YES TO RECYCLING”, helping you amplify the call to embrace “upcycled” wear.
Why choose this topic?
I chose upcycling as my focus as I've always been intrigued by the many different patterns and fabrics that goes into making an upcycled apparel and how to make them look good, especially when different materials combine together. I myself own multiple upcycled clothing and am looking into crafting them using my own materials.
Week 2
Cyanotype and Monoprinting
Cyanotype is a slow-reacting, economical photographic printing formulation sensitive to a limited near ultraviolet and blue light spectrum.
It produces a cyan-blue print used for art as monochrome imagery applicable on a range of supports, and for reprography in the form of blueprints.
Cyanotypes are one of the oldest photographic printing processes in the history of photography. The distinctive feature of the print is its shade of cyan blue, which results from its exposure to ultraviolet light.
First introduced by the astronomer, scientist, and botanist John Herschel in 1842, the cyanotype is one of Herschel’s most influential contributions to photography, engineering, and architecture.
How do cyanotypes work?
When ferric ammonium citrate or ferric ammonium oxalate is mixed with potassium ferricyanide, it becomes sensitive to UV light.
These chemicals can be painted onto paper or fabric and left to dry in a dark room. Once dry, objects can be arranged onto the paper and placed in the sun.
The UV rays from the sun react with the chemicals on the paper to create the recognisable cyan-blue background. Where the paper has been covered with an object it will remain white.
Unfortunately, the weather was not on our side on the day we decided to do the cyanotype print, so we used a UV curing machine instead as a substitute to sunlight.
Once the chemicals are rinsed off with water, fixing the print so it is no longer sensitive to the sun, the end result is absolutely stunning.
UV Curing Machine
Research
Blue Way Jay by Sue Pedley
In view of my topic revolving around fabric, I sought out artists that made cyanotypes show texture. I stumbled across Sue Pedley's online portfolio and was inspired by her use of garden-related textiles
Sue Pedley said, "In the galleries themselves I exhibited cyanotype photograms of various objects: plants (virginia creeper, lavender, leaves, grasses); garden-related textiles like netting and hessian; bamboo blinds; and perforated buckets. My research entailed fossicking through cultural and biographical documents, including the mythologised narratives of both sites. Equally important were the the sensations evoked by both places, drawn from times spent physically immersed in their sounds and sights."
Blue Jay Way was exhibited at Heide Museum of Modern Art , Melbourne, and Penrith Regional Gallery, Emu Plains, NSW.
I did not have access to the materials she mentioned, but I tried recreating the textures with cut out corduroy and a jersey knit shirt. Unfortunately, the patterns didn't last long and they soon turned into solid squares.
As I was searching for inspiration, I came across this image of what looks to be mesh and remembered that I had small square of mesh fabric. In hindsight, I should've cut a bigger piece as the one that out in my cyanotype print was quite small and overshadowed by the other materials.
Unfortunately, no further information was provided by the artist on her piece shown on the left side of the screen.
Untitled (Chain Mesh Cyanotype), 2018
Cyanotype on paper. Paula Crown
My take on cyanotype
Steps:
1. Mix equal parts potassium ferricyanide and ferric ammonium citrate into a container.
2. Use a sponge brush to lather the mixture onto fabric (in our case we used cotton) equally across all corners and edges.
3. Arrange all objects on the fabric.
4. Place the fabric and objects face down in the UV curing machine.
5. After the UV process is complete, soak the fabric in water to rinse the chemicals and also to rid the fabric off its sensitivity to normal light.
6. Blow dry fabric for easy storage.
Finished! Materials used were recycled fabrics (corduroy, mesh, cotton), artificial leaves, buttons, and crumpled paper. I chose the fabric that was placed on my cyanotype as they were the only fabrics I had on hand and I wanted to see if the weaving and pattern on them would turn out properly on the finished cyanotype. The leaves were placed to fill up space, but if I were to do this again, I would cut bigger pieces of fabric and also add a wider variety of them.
Reflection on Cyanotype:
I did this exercise completely blind in a way that I wasn't expecting what the end result would look like, but I was pleasantly surprised to find that the prints came out so clean. Unfortunately though, some pieces of fabric that I laid out eventually got smudged within each other that they became rectangular blobs. The process was tedious to me in the sense that there were particular measures to take, such as to not leave the room with the fabric after brushing on the cyanotype liquid, but thankfully I didn't make the mistake of messing up my print. The initial stages of the project involved preparing the light-sensitive solution and applying it to the chosen substrate, and this felt like a magical alchemical process, where chemical reactions between iron compounds and light transformed a blank canvas into an opportunity for artistic expression. If I were to do this exercise again, I would choose not to be restricted by the choice of botanical specimens and everyday objects, and instead use a more wide variety of objects from outside that category, such as having more fabric samples with unique textures, and perhaps some yarn/string. The moment when the print was revealed after rinsing was always filled with anticipation. The deep Prussian blue and ethereal white areas created an otherworldly effect, reminding me that art can emerge from the marriage of chemical reactions and creative vision. As someone with a love for blues, I was stunned with how pretty the print came out. One of the most fascinating aspects of cyanotype was its unpredictability. Each print was a unique interplay of light and shadows, a visual record of the moment when nature and art collaborated. Of course there would be imperfections, but they add character to the prints and gives reason to form cyanotype prints with new knowledge knowing what I do now.
Monoprinting
Monoprinting is a type of printmaking where the intent is to make unique prints. Other methods of printmaking create editioned multiples, the monoprint is editioned as 1 of 1.
It is made from a smooth surface or ‘plate’ coated in printing ink such as a sheet of glass or metal. In contrast with other printing techniques, only one final image is made, making the technique closer to drawing or painting than other print processes.
In our case, we had neither glass or metal, so we used a sheet of A3 paper to be pressed onto our cotton cloth.
Monoprinting, unlike other printing methods, the image created is only made once. This allows for more unique creations, but with more flexibility, as you can use a combination of monoprinting techniques including printing, drawing, and painting. Other forms of printing can be used to create multiple original prints, but monoprinting can only be made a single time.
On the other hand, monotype printing is a quick way to create an original single print, which can be done on a smooth, and non-porous surface, once-off. However, this can also be used more than once, which is known as “ghost printing”. These are taken after the first print or impression, so you will have a slightly faded look.
Research
In my search to find inspiration for monoprinting in regards to my topic revolving around fabric, I stumbled upon website showing how to print usig scrim, a woven material that may be either finely woven and lightweight or coarsely woven and heavy.
Starting off by pulling away threads from the scrim to fray the edges, the artist then manipulates the fibres to create gathers and holes.
I came across this print on Pinterest, but unfortunately I was unable to find further information regarding the type of fabric used.
I was intrigued nonetheless and sought after more prints with obvious fabric weaving patterns to use as my source of inspiration.
ERIN CONSIDINE, cinoh: “1084327: Weaving, monoprinted. 2009
After seeing this piece I realized that I was unable to recreate a similar piece using my own swatches of gingham, but I would be able to carve out the plaid pattern instead on another surface and use it as some sort of a stamp.
Though mine ended up being thin lines instead of thick, I think the effect still remains in the last monoprint as shown below.
squares 5, 2015, monotype on rice paper, 20.8x14.8cm, Margo Plenge
My take on monoprinting
Printed in red and blue ink, laid with artificial leaves, recycled corduroy fabric, leaves, and mesh. The leaves were placed as an afterthought to take up space. I wanted to recreate the images I researched but in hindsight I should've cut out larger pieces of my own fabric.
As my topic is based on upcycling fabrics for other purposes, I used more pieces of corduroy, mesh, and a jersey knit fabric to imitate their textures.
Printed in red and blue ink, laid with artificial leaves, recycled fabric, leaves, and mesh. I used cut out squares of fabric to show their textures, but as mentioned above, I wish I had cut them out into larger sizes to properly show the shapes.
Printed in red and blue ink, laid with linocut of plaid pattern to simulate the fabric's texture.
Reflection on Monoprinting:
Truth be told, I actually didn't know how to place my materials and the ink, so I was stumped for a few minutes thinking of the multiple possibilities to position my fabric the way I wanted it to be, and in the end I decided to just go for it. I quite like the way the mesh and corduroy fabric ended up, though the ink could've been placed more evenly for proper distribution across the cloth.
Week 3 & 4
Shibori Tie-Dye using Natural and Artificial Dyes
What is Shibori tie dye?
Shibori is a Japanese tie-dye technique dating right back to the eighth century. It originally came from China but gained popularity in Japan during the Edo period.
Shibori is a pinnacle of Japanese culture and has been used to decorate garments and homewares for thousands of years. The uneven lines created by the technique are a visual representation of the Japanese belief in the beauty of imperfection.
Where does the word Shibori come from?
The word shibori derives from the Japanese word shiboru which means to squeeze. In shibori tie dye, the fabric is squeezed in a number of different techniques to create the iconic pattern.
What is the best fabric for Shibori tie-dyeing?
Shibori tie-dyeing tends to work best on silk, cotton and hemp fabrics.
As sources of dye were limited in earlier times, an organic indigo colour was often used. We have used this traditional indigo colour in our tutorial but for a more modern approach, you could use a neon, pastel or brightly coloured dye.
Research
Hand dyed by Rina in her Winnipeg studio and no two items are ever the same, this buttery organic cotton mull is a generous size; it is a substantial shawl, scarf, wrap or sarong. Breezy and light.
It has a clean finish with a rolled hem in a beautiful dark periwinkle and white colour. The size is approximately 110 cm x 228 cm (43" x 90").
I was entranced by how clear the squares looked on this scarf and it compelled me to replicate it during this tie-dye exercise as I thought that it resembles a plaid pattern, and seeing how my topic revolves around fabric, I think it matches quite well with my intentions.
Hand Dyed, Organic Cotton Mull, Itajime
Handmade by Rina, owner of TogetherAndGo on Etsy
https://www.etsy.com/listing/1042180883/hand-dyed-organic-cotton-mull-itajime
Made by the Artists Coalition of Flagstaff, this scrunch tie-dye shirt was dyed in various shades of blue to give the cloudy/smoky effect.
I hoped to have my own rendition be as clear as what's shown to portray the different colours from my moodboard's colour palette.
ADULT TIE-DYE SHORT SLEEVE T-SHIRT, PATTERN: “BLUE SCRUNCH"
Tie-dye Exercises
Tying Method: Itajime
The most classic shibori look. Itajime is a technique where you fold a piece of fabric and then clamp it between two objects. The area that’s covered will remain undyed in the dyeing process. We sawed a piece of thin wood and drilled holes for wing nuts to make itajime clamps, but woodworking clamps, rubber bands or string work just as well.
To create a traditional Itajime pattern:
1. Accordion fold or “fan fold” the fabric in 4.5-inch / 11.5-cm wide folds down the length of the fabric. This will form a long rectangle. For more pattern variations, vary the size and width of the folds.
2. Accordion fold or “fan fold” the long rectangle into a 4.5-inch / 11.5-cm fabric square.
3. Sandwich the fabric square between the 4-inch / 10-cm blocks of wood.
4. Secure “sandwich” with rubber bands to tightly hold the fabric square together.
Final Result
What is the idea behind this?
I chose this method to see if I could conjure geometric lines and shapes when it's unfolded.
Tying Method: Accordion fold with ice cream sticks
To create the accordion folds:
1. Lay damp fabric out flat horizontally on covered work surface. Starting on the side closest to you, accordion fold (over & under) the entire fabric in even folds, working your way to the other side.
2. Bind your folded cloth by wrapping rubber bands around it, evenly spacing your rubber bands several inches apart. You can even wrap more around your fabric closer together; the more rubber bands you use, the more white space and accordion tie-dye patterns you’ll have in between your dye areas.
3. After folding the accordions, attach wooden ice cream sticks on the top and bottom of the folded fabric to sandwich it together and secure with raffia string.
Final Result
What is the idea behind this?
I chose this method due to the square pattern it creates when the fabric is unfolded and I wanted it to look like it resembles patchwork.
Tying Method: Scrunch
To create the scrunches:
1. Damp the fabric and scrunch a section of it.
2. Secure with rubber bands or raffia string tightly to ensure that no dye escapes.
3. Repeat scrunching across various sections of the fabric. With each section, vary the amount of fabric scrunched. Continue until majority of the fabric is scrunched.
4. End off with shaping the whole thing into a ball and secure with even more rubber bands.
Final Result
What is the idea behind this?
As part of my upcycling topic, I used an old t-shirt of mine as the fabric in which I wanted to use this tie-dye method on. I chose the scrunch method as I was intrigued with the cloudy effect it would give.
Tying Method: Swirl (using natural dyes)
Preparing the natural dye (spinach)
I offered to prepare green dye using baby spinach for the class. Below are the ingredients and steps I followed to a T to ensure that I extracted the dye correctly.
Ingredients
-
4 cups of fresh green spinach
-
Saucepan
-
10 cups Tap water
Steps
-
Start by chopping spinach and place it in a small saucepan.
-
Now, pour twice as much water as you have spinach. Turn on the stove and bring it to a boil.
-
Keep stirring, then allow it to cook on low flame for an hour. And then turn off the stove.
-
Once the mixture has cooled, strain it well and now can start using spinach to dye fabric.
Step 1. Chop up the spinach into tiny bits. This took me quite awhile as the knife I used was not as sharp as I thought it would be, thus making me take more time than expected, but the end result was worth the effort.
Step 2. Dump the chopped up spinach into a pot of water and bring it to a boil.
Step 3. While stirring, lower the heat to as low as it could go and let it simmer for one hour. When the hour is up, turn off the flame and transfer to a bowl and prepare to separate the spinach bits from the juice- I mean liquid.
Step 4. Strain the bits from the liquid by using a strainer. In my case I didn't have a big one so I used a small tea strainer. This step took the most strength out of me as I underestimated the amount of liquid held in the spinach bits. I strained it as best as I could and threw the bits away.
And finished! The end result looked like sewage water to be honest and the smell is not pleasant (so is the taste).
To create the swirl tie-dye:
1. Lay damp fabric flat on your work surface.
2. Pick a spot on the fabric for the center of your spiral. Pinch a small section of fabric. Hold on to that small section while you twist your fingers clockwise.
3. Keep twisting. As you twist, keep your fingers close to the surface of the table so that the spiral stays flat. The fabric will fold around itself, like a flat cinnamon roll. Keep twisting until the entire item is rolled up.
4. Secure the fabric bundle with three or more rubber bands, crossing them over the center of the spiral. This will create wedge-shaped areas between the bands.
What is the idea behind this?
This tie-dye was made solely to test out the natural dyes. I used my spinach dye, the blueberry dye, and tea dye but unfortunately, not much of the dyes were visible as they came out very faint.
Final Result
Tying Method: Mix of scrunch and accordion folds
To create the scrunches and accordion folds:
1. Starting on the side closest to you, accordion fold (over & under) the entire denim in even folds, working your way to the other side.
2. Scrunch a section of it and scure with rubber bands tightly to ensure that no dye escapes.
4. End off with tying the whole thing with even more rubber bands.
What is the idea behind this?
As my topic revolves around the usage of already existing fabric that I have, I thought it would be fitting to try out this exercise using a cut out piece of denim from a denim jacket that I had purchased from Bricklane Vintage, London. As this jacket was already bleached, I wanted to try bleaching it as well due to it being a dark colour, thus no normal dye would be able to penetrate through the fabric. As for the method used, it was the only method(s) I could think of that is easy to fold due to to denim being quite thick.
Final Result
Tying Method: Kanoko
To create the Kanoko tie-dye:
-
Wet fabric and squeeze out any excess water.
-
To create a traditional Kanoko pattern, pinch the center portion of the fabric and hold it in the air, letting the 4 corners drop.
-
About ½” from the pinched center, wrap fabric tightly with a rubber band.
-
Continue by wrapping twine in a crisscross pattern down the length of the fabric. Pattern will vary based on the spacing and wrapping of the twine.
What is the idea behind this?
Rather than create a print in relation to my topic, I was more curious of the colour the dye would form, seeing as how it would fade as it dries. As my moodboard has the colour of a muted red in it, I thought to experiment with the Kanoko tie-dye method, seeing as when tightly bound, it creates obvious folds and ripples along the fabric. When unwound, the fabric forms a unique texture of wrinkles starting from one part of the fabric, and I thought that it looked quite pretty and fitting to my topic of reused fabric, but furhter into the fabrics aspect of it.
Tying Method: Accordion Fold
To create the accordion folds
-
Wet fabric and squeeze out any excess water.
-
Lay your damp shirt out flat horizontally on your covered work surface. Starting on the side closest to you, accordion fold (over & under) the entire shirt in even folds, working your way to the other side.
-
Bind your folded fabric by wrapping rubber bands around it, evenly spacing your rubber bands several inches apart.
-
After the dye colours have completely set, remove the rubber bands by carefully cutting away from your project. Rinse, wash and dry separately
What is the idea behind this?
I was intrigued by the texture and pattern that the accordion fold method would give, given they it must be tied at certain areas to prevent unravelling and to prevent the liquid dye from seeping to areas where it shouldn't. The red-sih markings on the fabric though, were placed by accident. I was picking up the fabric with red dyed hands, leftover form the previous tie-dye (kanoko) and didn't ought to was my hands first before handling a new piece. But honestly, I think those markings add character to an otherwise plain pale blue fabric.
Reflection on Tie-Dye:
Attempting the various tie-dye techniques were both captivating and challenging. The process of folding, binding, and dyeing required a balance between creative expression and scientific precision. This exercise also expanded my skills in tie-dye and textile art while providing a deeper appreciation for the hidden beauty within the folds. Tie-dye also encouraged me to approach creativity with a more eco-conscious mindset, seeking to minimize waste and make art from the discarded.
Week 5
Sashiko and Boro
What is sashiko?
Sashiko (刺し子?, literally “little stabs”) is a form of decorative reinforcement stitching (or functional embroidery) from Japan. Traditional sashiko was used to reinforce points of wear, or to repair worn places or tears with patches. Today this running stitch technique is often used for purely decorative purposes in quilting and embroidery. The white cotton thread on the traditional indigo blue cloth gives sashiko its distinctive appearance, though decorative items sometimes use red thread.
What are the different types of sashiko?
The generic style of sashiko embroidery follows a geometric pattern divided into five main kinds. Moyozashi uses running stitches to create linear designs, while in hitomezashi, the structures emerge from the alignment of many single stitches made on a grid. Kogin, which means small cloth, is a type of darned embroidery from the Tsugaru district of Honshu. Shonai sashiko, which comes from the Shonai region of Yamagata prefecture, has straight lines that cross each other. And if the art uses indigo-dyed threads, it is called kakurezashi.
What is boro?
Boro (ぼろ) are a class of Japanese textiles that have been mended or patched together. The term is derived from the Japanese term "boroboro", meaning something tattered or repaired. The term 'boro' typically refers to cotton, linen and hemp materials, mostly hand-woven by peasant farmers, that have been stitched or re-woven together to create an often many-layered material used for warm, practical clothing.
Historically, it was more economical to grow, spin, dye, weave and make one's own clothing over buying new garments, and equally as economical to re-use old, worn-out clothing as fabric for new garments; warmer fibres such as cotton were also less commonly available, leading to the development of layering as a necessity in the creation of lower-class clothing.
What about.. boro stitching...?
The raw simplicity and functional beauty of the boro artform is something that has been adored for some time.
Boro is essentially the practice of using a simple running stitch (a sashiko stitch) to reinforce a textile item using spare or would-be-discarded scraps of fabric. It is a practice that grew out of necessity in medieval Japan, and has evolved, four centuries later, into a distinctively gorgeous textile artform. Like sashiko itself, boro combines practical functionality with beauty.
Research
Seeing as boro stitching correlates directly to my theme in terms of upcycling fabric to turn them into something new, I was excited to try it out. But of course before doing anything, I had to research on the designs that I would want to do for my take on sashiko and boro textiles.
Central to boro is the concept of finding beauty in mending—that nothing should ever be wasted, and that imperfections have their own subtle and simple appeal.
Just as sashiko embroidery has become a popular worldwide textile craft, so has boro. It has transcended its origins to become a form of textile design and artistic expression. A number of influential Japanese sashiko artists are active in the creation and exhibition of some exquisite boro textiles.
Sashiko artist Keiko Futatsuya creates boro pieces with antique or vintage Japanese fabrics and vegetable dyed sashiko threads to capture that traditional ethos and feel. In 2016, Indigo Niche exhibited some of Keiko Futatsuya’s boro work at the Brisbane Craft and Quilt Fair, and it generated a lot of interest.
Made by Keiko Futatsuya, exhibited at the Brisbane Craft & Quilt Fair in 2016
Made by @byefrisbie on Instagram, I found his account by chance on my explore page. His work revolves around upcycling materials to turn them into unique bags and occasionally apparel as well. I admire his excellent craftsmanship and I like that some of his work matches my style too.
This bag shown was made from scraps of thrifted jeans the artist used in previous projects, a lot of hand stitching went into this piece as evident by the sashiko threading on the outside of the bag, and the boro textiles used for the exterior.
Made by https://www.byefrisbie.com/
Sashiko Exercise
Before starting on the stiches, I first took a piece of cut out denim from a denim jacket that I had cropped, as use that as the base for this exercise. I then used running stitches to sew two pieces of a knitted t-shirt onto the black fabric.
On another piece of white fabric that I had cut out from a t-shirt, I used that to practice my sashiko stitching before attempting the real thing. Whilte practicing, I found that I should make my stitches more even in size with each other and even in distance within one another.
Now onto finally attempting sashiko onto my sewn on fabric, I found some geometric patterns on Shutterstock and used chaco paper and the rolling tracer tool* to replicate the pattern onto my fabric. The reason why I decided to use geometric patterns despite the exercise already revolving around my topic of upcycling fabric, is because the geometric patterns are similar to clothing fibers when seen under a microscope as shown.
As I started on my sashiko, I found that it is quite difficult to stitch when the fabric is as hard to penetrate through like denim. I suffered many pokes through my skin as I was pulling the needle through the fabric, and my fingers were red and hurt for days. The pain was worth it though, as the end result was quite pretty. I've always wanted to know how these stitches were made anyway, and I was glad to have the opportunity to find out.
Final and Reflection on Sashiko:
Final result! I also decided to sashiko another piece of fabric that I stitched on at the side. I didn't like how it turned out halfway through though... as the stitches eventually became less equal in size. I left it as it is in the end, as I think that it would be a waste of my efforts if I were to unstitch everything. Trying the sashiko stitching technique was both calming and challenging. Each stitch needed to be uniform in size and spacing, which demanded steady hands and unwavering patience. It was a testament to the value of simplicity and precision in handcraft. The repetitive nature of Sashiko stitching was meditative, and it offered a serene and contemplative space for reflection, self-expression, and creative growth. I often found myself putting on a YouTube video to watch while I was sashiko stitching.
week 6
Embroidery & Appliqué
What is embroidery?
Embroidery is the craft of decorating fabric or other materials using a needle to apply thread or yarn. Embroidery may also incorporate other materials such as pearls, beads, quills, and sequins. In modern days, embroidery is usually seen on caps, hats, coats, overlays, blankets, dress shirts, denim, dresses, stockings, scarfs, and golf shirts.
Embroidery is available in a wide variety of thread or yarn colour. It is often used to personalize gifts or clothing items.
Some of the basic techniques or stitches of the earliest embroidery are chain stitch, buttonhole or blanket stitch, running stitch, satin stitch, and cross stitch. Those stitches remain the fundamental techniques of hand embroidery today.
Different types of embroidery stitches
1. French Knot
For many stitchers, making French knots remains a challenge. While it may take time to learn, it's worth the effort. Not only is this a common stitch to find in embroidery patterns, but it's also a good stitch to use when making a textured fill or other design elements.
This stitch involves wrapping the needle to form a knot on the surface of the fabric. The trick to making French knots is to hold the working thread taut, but not too tight.
2. Back stitch
Backstitch is so easy to learn that you'll have it down within the first few stitches. This basic stitch is likely to be the stitch you'll use the most. Backstitch is useful for any kind of outlining, but it's also a stitch that pairs well with other stitches, making it a key stitch to learn.
It's also easy to embellish with weaving or wrapping, and quickly transforms into the more decorative Pekinese stitch.
3. Chain stitch
If you want a bolder line of embroidery, then chain stitch is the stitch for you. Chain stitch forms a row of linked stitches that really stands out.
4. Stem stitch
Stem stitch is another basic stitch that's perfect for creating smooth outlines. It works well for both straight lines and curves, and despite its name, it isn't only for embroidering stems. Use a stem stitch on just about any lines in your stitching.
5. Satin stitch
One of the most classic embroidery stitches for filling an area is the basic satin stitch. There are a few variations, but at its essence, satin stitch is a series of straight stitches worked next to each other. The secret to making those straight stitches turn into something special is in practicing the length and proximity of the stitches.
6. Lazy Daisy
This stitch is often used to make petal shapes and small leaf patterns. It consists of a single loop of chain than a continuous pattern. Lazy daisy is one of the extremely easy stitches. This stitch need not be limited to just petals and leaves but can be used for more complicated designs.
7. Star stitch
The star stitch is a canvas embroidery stitch consisting of eight straight stitches, all worked into the same central mesh with their outer edges arranged together to form a star. The squares can be worked individually or in rows. This stitch is used in Hardanger work and drawn-thread work.
What is appliqué?
Appliqué is ornamental needlework in which pieces or patches of fabric in different shapes and patterns are sewn or stuck onto a larger piece to form a picture or pattern. It is commonly used as decoration, especially on garments. The technique is accomplished either by hand stitching or machine. Appliqué is commonly practised with textiles, but the term may be applied to similar techniques used on different materials. In the context of ceramics, for example, an appliqué is a separate piece of clay added to the primary work, generally for the purpose of decoration.
The term appliqué is derived from French and Latin verbs appliquer and applicare, respectively, which both mean to join or attach. Like embroidery, it has a humble beginning. The technique was used as a way to strengthen worn areas of items or to patch holes that had formed. Early appliqué was used to lengthen the life of clothing and moved into artful techniques that can be seen in blankets and quilts from numerous cultures from all over the world.
Embroidery and Appliqué Exercise
As my topic revolves around the usage of old fabric and its patterns, I searched up for inspiration on Google before starting on my embroidery and came across this image of an embroidered checkered pattern. I then decided to create my own version of it for my embroidery exercise.
I also made a mock up of what I would like my embroidery and appliqué piece to look like. The base is made by layering fabric atop one another, and the checkered pattern would be embroidered on top of it. Red ribbons would then be placed as decoration for the piece.
Applying the knowledge of appliqué, using a knitted sweater, denim, linen, knitted t-shirt, and rib knit. I layered them atop one another to form a sort of layered mountain landscape but in portrait mode, and I used bonding paper to attach these fabrics together without the need to sew.
Before embroidering the plaid pattern, I had to draw a few lines of my own to sashiko over so that I would have a guideline for my embroidery. Upon drawing on the lines, I realized that I didn't want to sew over all of them, so I settled on choosing lesser lines to embroider over.
Final and Reflection on Embroidery:
Embroidering a plaid pattern over appliqué fabrics was an intricate and creative endeavour that allowed me to explore the harmonious intersection of traditional handcrafts and contemporary design. Selecting the right plaid pattern and coordinating appliqué fabrics was the first challenge, and the combination of both allowed for a unique fusion of styles. Embroidering a plaid pattern demanded patience and a meticulous hand, which was why I had to reduce the difficulty and instead add more space in between the parallel embroidery. I also added red ribbons that I've had for the past year to the design as a statement piece, while also driving home my theme of reusing fabrics (upcycling). Choosing the appliqué fabrics was a creative process in itself. I wanted each fabric piece to complement the plaid pattern and create a harmonious visual effect. It was a lesson in understanding how different textures and colors interact with one another. This exercise expanded my skills in embroidery and textile arts, especially since I've been wanting to try out embroidery on my own, yet never found the time to start. It provided a deeper understanding of the importance of craftsmanship and how a combination of techniques can yield unique and visually striking results. This exercise has opened doors to further explorations of combining diverse techniques and materials in art, and I look forward to experiment with different patterns and textile combinations to continue pushing the boundaries of creativity, maybe not just in fashion but also other mediums of art.
Week 7
Plastics
Obsesssion of Plastic Usage in the Fashion Industry
The fashion industry has an addiction to plastic – and it’s casting a long shadow on the health of our planet. Each year, the industry uses 342 million barrels of petroleum to produce plastic-based fibres such as polyester, nylon or acrylic. This equates to 1.35 per cent of the globe’s oil consumption.
Worse still, these plastic-based fibres are responsible for 73 per cent of microfibre pollution in Arctic waters and, according to the Ellen MacArthur Foundation, the plastic packaging on which the fashion industry is largely reliant, is estimated to make up 26 per cent of the total volume of plastics created each year – 72 per cent of which is thrown away. However you choose to measure its impact, the numbers are staggering.
Most fashion brands are now producing almost twice the volume of clothing they produced in 2000, with most of that growth coming from clothes made using plastic-based fibres. Only a tiny proportion of these fabrics are ever recycled, with the vast majority of our clothing ending up in landfill or being shipped to countries in the developing world. It’s clear that as the amount of clothing being produced each year increases, so too does the size of the fashion industry’s plastic problem and plastic waste.
How is Plastic Used in Fashion?
When environmental scientists noticed polyester, a primary component of fabrics such as fleece, was the most common type of microfiber found in the environment, they began investigating how and why textiles were shedding so many microfibers. The 2017 Ellen MacArthur Foundation report, A New Textiles Economy: Redesigning Fashion’s Future, pointed out how in recent decades the fast fashion sector ramped up demand for plastic-infused clothes with “quicker turnaround of new styles, increased number of collections per year, and lower prices.”
Fast fashion relies on enormous virgin plastic production to enable growth; the report estimates that 63 percent of the materials used for clothing in 2015 were virgin plastic compared to less than 3 percent being recycled material.
Clothes – especially fast fashion – are made of these cheap plastic materials. While wearing or washing, these clothes shed tiny plastic particles that end up in the environment, in animals and even in our bodies.
With the restricted amount of plastics I brought, I decided to create a bag out of them. I thought of the various options and with what I've got, I decided on creating a tote bag. When preparing the tote bag, I laid the plastic apron flat on a clean, flat surface. I brainstormed on the size of my tote bag, and decided that the size of my bag would be half the size of my apron. As my apron was essentially rectangular but with a hollowed circle at the top, I simply attached two aprons together and folded them up to the top.
I then ironed the plastic apron at the sides and the hem, to ensure that whatever I put inside the bag wouldn't fall out of any holes. When the tote bag was done, I realized that it was a bit too plain, of course due to it being white and without any branding. I had a piece of orange Art Friend plastic laying around and cut out a rectangular size out of it, with the branding on the plastic. I then ironed the orange plastic onto my tote bag, and the end result looked like a limited piece of merchandise from Art Friend itself.
Reflection on Plastics
The experience of making a plastic tote bag from a plastic apron was an intriguing and innovative endeavor that challenged my preconceived notions of materials, creativity, and sustainability. Working with plastic materials, especially repurposing a plastic apron, was a fresh perspective on sustainability and it forced me to confront the issue of plastic waste head-on, and provided an opportunity to contribute to a more sustainable future. The process of reusing a plastic apron as the primary material emphasized the importance of repurposing and recycling in our daily lives. Selecting a design that would make the most of the plastic apron material was a creative challenge as I had to consider the texture and durability of the plastic. The process of ironing the plastic apron into a tote bag required multiple testing. I've never ironed plastic before out of fear for burning through it and it was imperative to avoid overheating the material. It was a valuable lesson in thinking outside the box and adapting to the unique properties of plastic. This exercise advanced my mindset regarding sustainability, as it highlighted the potential of repurposing materials we often discard without a second thought. It made me question the disposability of everyday objects and inspired me to seek out opportunities to upcycle and repurpose in other aspects of my life that isn't relating to fashion. The completed plastic tote bag was not only a creative achievement but also a functional item with a positive environmental impact. Should I redo the tote bag with an improved design and actually use it while out and baout, I think it would serve as a conversation piece, allowing me to explain the concept of upcycling to others and promote the idea of reusing materials.
week 9 & 10
Batik
What is batik?
Batik is an Indonesian technique of wax-resist dyeing applied to the whole cloth. This technique originated from the island of Java, Indonesia. Batik is made either by drawing dots and lines of wax with a spouted tool called a canting, or by printing the wax with a copper stamp called a cap.
The applied wax resists dyes and therefore allows the artisan to colour selectively by soaking the cloth in one colour, removing the wax with boiling water, and repeating if multiple colours are desired.
Batik is an ancient art form of Indonesia made with wax resistant dye on fabrics. Indonesian coastal batik (batik pesisir) made in the island of Java has a history of acculturation, a mixture of native and foreign cultures. It is a newer model compared to inland batik, and it uses more colors, though the patterns are less intricate. This is because inland batik used to be made by select experts living in palace areas, while coastal batik can be made by anyone.
Batik is very important to Indonesians and many people wear it to formal or casual events, they are commonly used by Indonesians in various rituals, ceremonies, traditions, celebrations, and even in daily uses.
Origin of Batik
The word batik is Javanese in origin. The word bathikan also means "drawing" or "writing" in Javanese. When the word is absorbed to Indonesian, the "th-" sound is reduced to a "t-" sound more pronounceable to non-Javanese speakers.
The word batik is first recorded in English in the Encyclopædia Britannica of 1880, in which it is spelled as battik. It is attested in the Indonesian Archipelago during the Dutch colonial period in various forms such as mbatik, mbatek, batik and batek. Batik known as euyeuk in Sundanese, cloth can be processed into a form of batik by a pangeyeuk (batik maker).
Batik is an ancient fabric wax-resist dyeing tradition of Java, Indonesia. The art of batik is most highly developed and some of the best batiks in the world still made there. In Java, all the materials for the process are readily available—cotton and beeswax and plants from which different vegetable dyes are made.
What is the wax used in batik?
Batik wax is a combination of paraffin, beeswax, and resin. It is a translucent yellow when it is fresh, but may look dark brown or black after many reuses. The artisan retraces the design on the cloth with wax using the canting. Some areas are then filled in with decorative detail, known as isen-isen.
The wax can be applied with a variety of tools. A pen-like instrument called a canting (Javanese pronunciation: tjanting, sometimes spelled with old Dutch orthography (tjanting) is the most common. A tjanting is made from a small copper reservoir with a spout on a wooden handle. The reservoir holds the resist which flows through the spout, creating dots and lines as it moves. For larger patterns, a stiff brush may be used.
My take on batik
Fig. 1
Before starting on the actual batik print, we practiced handling the tjanting tool. I've actually done batik a few times as a sort of exercise for Malay students back when I was in Secondary 1 or 2, so using the tjanting tool to form patterns is not foreign to me. Even back then, I struggled in holding the tool while ensuring that the wax that flowed from it would create a proper floral pattern without making too much mess.
When I encountered the tjanting tool again this time round for the batik exercise, I at least knew to be quick in drawing my patterns. The patterns I chose to draw onto my batik print were geometric shapes to replicate what fabric fibers look like under a microscope. I was fast in drawing these shapes, though of course they were easy enough to draw considering they are just lines, but they needed to be drawn such that the wax would pass through the other side of our fabric and also to ensure that our lines are closed so that our coloured dye will not seep through past that particular line.
Fig. 2
After practicing with the tjanting tool using the old and new batik wax, I decided to use the new wax as shown on Fig. 2. Reason being, the wax looks cleaner and I didn't want to risk the old wax leaving a mark due to the dark nature of it.
In preparation for the final batik print, I sketched out my geometric patterns onto the cotton fabric. I left a big area empty to be filled with wax just so that I could break them apart to form fine lines in between with coloured dye.
I also decided to create a second geometric batik print, but this time without any large parts of wax to break.
Adding in liquid dye in accordance to my colour palette from my theme's moodboard, reds, blues, beige (in the wax). Unfortunately I was unable to create black, so I settled with greys.
Followed the colours in reference to my colour palette from my chosen theme of upcycling fabrics. As mentioend, I left a chuck of space to pour wax on it for the purpose of breaking apart the wax to smear liquid dye in the cracks of the wax to form fine lines that much closer resemble what fabric fibers look like under a microscope.
Batik wax removal techniques
1. The Hot Iron & Paper Technique
- This was the preferred way to remove wax from batiks, especially for wall hangings back in the 1970s
- With the hot iron and paper technique you sandwich your finished batik project in between layers of brown paper (or packing paper, newsprint, etc.). Then you go over the paper with a very warm iron.
2. Taking it to the Dry Cleaners
- Not recommended as some dry cleaners will still take your wax-covered things and use powerful chemicals like paint thinner to remove them from the fibers. Downsides to this method include yucky chemicals, it costs a lot of money, it’s bad for the people who have to do it for you, and it can be stinky.
3. Boiling (as shown in the video to the left)
This method has many upsides:
-
It completely removes the wax out of your fabric (as long as the fabric is not synthetic), so you get a very soft, wax-free finished project.
-
It allows you to re-use your wax, which is great for your wallet and great for the planet, especially if you’re using pure beeswax.
-
You can use the same water again and again until it’s too dark to see through anymore, thereby saving water.
-
You can boil & boil again if you don’t get a complete boil-out the first time.
Time to finalise the batik print! I went with the hot iron and paper technique as I've done it before. As mentioned, I've done batik when I was in my Lower Secondary days
Final and Reflection on Batik:
Choosing the right geometric pattern was the initial challenge. I wanted a design that was visually appealing while also reflecting my theme of reusing fabrics. Applying the wax to fabric was a delicate process, and I soon realized that achieving precision in my design was far from easy as it was meticulous and time-consuming that required patience and a steady hand. Having patience was one of the most valuable lessons from this project, with the other being the importance of precision when applying the batik wax using the tjanting tool. Dyeing the fabric too required me to ensure that it didn't seep through the lines. Crafting this batik print deepened my appreciation for the rich cultural traditions behind this art form. It was a reminder of the importance of preserving and celebrating traditional crafts, especially as a Malay person and having been exposed to numerous batik prints and clothing.
week 10, 11, & 12
Group Project
GROUP PROJECT WITH JOVI
Sustainable artifact
What are we making:
- Apron
- Utility belt
Techniques to use:
- Sashiko/boro
- Tie-dye
- Embroidery
Things to note:
Avoid spending money on this assignment (don’t buy fabric and any other material, just use what’s already available/take from other garments)
Product idea:
The tailor tool roll apron is a utility garment that can be served in both fashionable and functional way
Fabric to use:
- Non-clothing textiles (cause it is sustainable to use fabrics that are already used)
- Upcycled fabrics from actual garments (also because it is sustainable)
Image References
Discussion
Jovi and I discussed on whether or not we should make the smaller apron, or the larger one, when we got the idea that we could each do one apron so that we can bring them home for our own usage. We decided on Jovi making the smaller the apron with its main position being at the front of the waist, and I will do the longer apron that's meant to be worn at the side.
Additionally, although they have their own positions as mentioned, we made it so that they are able to placed anywhere around the waist. We also decided that both our aprons should be combined such that they would form an asymmetrical skirt. We distributed who would do what technique, and we started on our group project from there.
Sketch
Before starting on the apron, I thought it would serve me well to create a sketch of it and how many pockets to place on the apron, so that I'd have an idea of the placement.
As for the base, I was thinking of having it be made of denim boro-sashiko for it's stability and roughness.
Measurements
Strap Measurements
Width: 2cm
Length: 200cm
Apron Measurements
Length down: 85cm (including strap folds and before seam allowance)
Width: 45cm (before seam allowance)
Apron Measurements after Seam Allowance
Length down: 99cm
Width: 49cm
Digital rendition of the final pattern for my apron.
After the sketch, Jovi and I decided to make mock-ups out of leftover calico of our design so that we could see what are the changes that we should make and what (if any) part of our stitching should we keep.
Regardless of the simplicity of our aprons, we still wanted to create mock-ups anyway so that we may brood over pieces that we would want to add.
Pictures of my part of the mock-up on body.
Sourcing for fabric
As we wanted to use old fabrics from garments that we already have, I found out that I may not have many unused fabric that's rigid and tough enough to withstand the various tools that people use a utility apron for, so I also asked a few friends around if they had any fabric laying around that they wouldn't mind handing over to us for this project.
Eventually, my friend from the 3D domain said that she has designer tweed that she won't use and gave quite a massive stack of them to us. When we received the fabric though, it changed the entire game for us.
We decided that we should not have a denim base anymore, and instead use these tweed fabrics as our apron.
Jovi also brought to class a variety of denim skirts and shorts for us to cut out fabric from. We then got the idea to just unpick the pockets and use them for our utility aprons instead of making the pockets from scratch. I managed to unpick 6 pockets from three denim bottom, and set them aside for usage.
Option 1
Option 2
Before we starting sewing on our final product, I laid out the fabrics in class to view my options on how I would want my part of our apron to look like. Above are my options for the apron.
After deciding on the placement of the tweed fabric, I started sewing right after to quickly finish the apron so that we'd have time to complete the rest of it.
I also sewed a piece of stretchy denim fabric together for the stationary and tool holder.
As Jovi and I decided to incorporate sashiko into our project, I decided to do running stitches across the cut out denim pockets that I took out from her old jeans. Doing these was actually quite therapeutic, and I didn't expect to do all three of them within a span of a few hours.
As shown in previous pictures above, I managed to stitch the tweed fabric together to form one big rectangular base for the utility apron. Unfortunately though, I realised that the white thread that I used to contrast against the fabric wasn't stitched neatly.
To combat the appearance of uneven stitches, I decided to embroider over them using chains stitches. I didn't want the embroidery to be seen on the wrong side of the apron, so I embroidered between the tweed yarns.
Attached are pictures of the apron try-on to view how to shape looks like on body.
Continuous embroidery on the apron stitchings.
Sewing the top of the apron to secure the belt buckle, side seams, and the hem. Because the tweed fabric made the cloth very thick to sew, I had to do this step slowly and steadily to prevent the needle from breaking. I was surprised to find that after awhile though, it was quite easy to sew through the thickness.
Laying out my pieces of denim pockets and other fabrics before sewing to see how they look like.
Sewing the strip of fabric as the stationary and tool holder onto the apron.
Sewing on the pockets onto the tweed apron. I followed the stitch lines from the previous stitch that I unpicked, so it was easier to sew the pockets. The only challenge was to ensure that the sewing is neat and even, and it seems that I still need to practice on my sewing often to be more confident.
After I finished sewing the pockets, I realised that the colours are a bit dull. I asked Jovi for her opinion and she suggested that I add a bit of beige to brighten the overall colour scheme. I found a few beige fabrics and added them onto the apron for decoration and a pop of colour.
Final product! At least for my part of the project. Overall I quite like how it looks and how functional the pockets and tool holder, and how the colours come together. The texture of the tweed too contrasts with the smoothness of the denim pockets.
I think I made the right decision in embroidering over my initial threads that are keeping the tweed together, as the white thread also contrasts against the dark colours of the tweed base.
If I were to remake this apron though, I would ensure that the pockets are stitched straight parallel against the side seams. Unfortunately the pockets were already uneven to begin with, so try as I might, I couldn't stitch them without having them be crooked.
Front view // Apron placed to the wearers left.
Front view // Apron placed to the wearers front.
Side view // Apron placed to the wearers right.
Placing Jovi's apron with mine to form an asymmetrical skirt.
We added a bunch of stationery and tools to check the functions of our pockets and how they withstand multiple items.
Reflection on our Group Project:
Our project aimed to upcycle old textiles into functional but also stylish utility aprons, while also putting into use any of the textile methods that we've learned. We selected this idea as not only was it sustainable, it was also fairly simple to sketch out and create with our given time frame of 2 weeks, and Jovi and I agreed to use my initial textile topic of upcycling fabrics. Throughout the project, Jovi and I collaborated effectively by brainstorming ideas and sketching designs, and making sure we were on the same page regarding our vision with the mentioned utility aprons, given that we decided to do one apron each so that we would be able to combine them to form an asymmetrical skirt.
Challenges are inherent in any project, and our upcycled apron project was no exception. The most significant challenge we faced was finding suitable materials to upcycle. We had to ask multiple of our friends from other domains, and from outside NAFA, if they had any unused fabric or apparel. Eventually, we got multiple donations, namely the designer Raf Simons tweed that we used as our base for the apron, which was given from a friend I made from 3D Domain. This project allowed us to hone our sewing skills and patience when sewing through thick fabrics. We both also deepened our knowledge of sustainable practices, appreciating the value of repurposing old items instead of discarding them.
In the end, we successfully created unique and stylish aprons from unused tweed samples that would have otherwise gone to waste. Our upcycled aprons not only looked good but also carried a story, adding a personal touch to both pieces. This project allowed us to appreciate the beauty in imperfections and the satisfaction of creating something with our own hands. Effective communication was a cornerstone of our successful collaboration. We regularly shared ideas, progress updates, and constructive feedback. If we disagreed on design choices or encountered issues during construction, we approached these discussions with respect for each other's opinions. This open communication facilitated creative problem-solving and ensured that we were both satisfied with the final product. Working on this upcycled utility apron-turned-skirt project was a rewarding experience that showcased the power of creativity and sustainable practices. It also highlights the importance of effective collaboration and open communication in a group project, which is necessary in the advancing world.
Year 1, Semester 2 week 1
Marbling
What is marbling?
Marbling is the art of printing multi-colored swirled or stone-like patterns on paper or fabric. The patterns are formed by first floating the colors on the surface of a liquid, and then laying the paper or fabric onto the colors to absorb them. Marbling is sometimes still called by its original Turkish name, ebru.
Marbling originated in Japan in around the twelfth century. Some believe it was discovered by accident by someone in the Japanese imperial family who submerged sumi ink paintings in water, watched the inks float to the surface, then put a piece of paper on the floating ink, lifted it up and preserved the image. This technique was termed Suminagashi, or "ink floating."
During the sixteenth and seventeenth centuries marbling spread to Europe, but the trade secrets were kept that way by only a handful of people. They named patterns after their countries: i.e., Old Dutch, French Curl, and Italian Hair Vein, which are still used today. Apprentice marblers were taught only one step of the marbling process, and some were actually forced to work behind wooden partitions to keep the other workers hidden. Most marbling was used for decorative bookbinding.
Marbling Methods
1. Ink Marbling
To create very light marbling effects, using ink is a good option. This technique creates a soft light marbling that you can easily draw over, write a letter on, or make calligraphy over.
For best effects, thicken the water before dropping your ink on top of it. Gently drop the ink, and then swirl either by fanning or with some kind of spoon. Work gently. Since ink is likely to flow and run, too much disturbance may simply dye the paper rather than marbling it, so be careful not to overmix.
2. Nail Polish Marbling
Nail polish marbling is a good option for marbling on different surfaces and substrates since it tends to be more permanent than other home marbling methods. The nail polish method does tend to have a distinctive smell, however, and it requires adult supervision.
Most nail polish will float on water automatically, but the key is to work quickly and finish your marbling before it does sink to the bottom. When you’re ready, gently press the item that you want to marble into the nail polish, then remove it and allow it to dry.
3. Spray Paint Marbling
Marble large sheets of paper with eyepopping colors by using spray paint. This is also a good way of adding some vibrant metallic colors, such as gold and silver into your marbling. Since spray paint has a strong odor, make sure to work outside or in a well-ventilated area.
With this technique, it’s best to work rapidly. Apply the spray paints to the surface of the water for marbling. Then, stir or arrange the colors. Quickly apply the paper to the surface and remove it.
4. Oil Paint Marbling
Oil paint marbling is one of your best options for creating a vibrant marbled artwork. Not only do the colors remain vibrant, but the oil paints also give you the most control over the design or image. Keep in mind, however, that since oil paint will remain on the surface of the paper, you may not have as much freedom to draw or paint over the design.
This technique requires genuine oil paints and thickened water. Make sure to do some tests before beginning. Since oil paint can be dense, your testing should make sure that the pigments float on top of the water. Dilute the paint to the point that it’s still thick enough to be vibrant but not so thick that you can’t drop of blend the colors. Then use tools to stir and shape the colors how you want them.
My Take on Marbling
My first marbling attempt, I used the Marabu Easy Marble ink to mimic the random lines, shapes, and sizes that represent fabric when shown under a microscope, as shown in Figure 1B. I don't think that this attempt shows what I want to convey, because as compared to the image shown beneath it, there are no parts of it that resembles fabric strings. As for the colours, I used similar colours shown in my moodboard, blues, reds, black & greys.
5. Food Colouring and Shaving Cream Marbling
This technique is as simple as swirling the food coloring into a layer of shaving cream, creating the design you like, and then press the paper down onto the layer of shaving cream, evening it out as you go. And then scraping off the shaving cream once you remove the paper.
Fig. 1A
Fig. 1B
Scanning electron micrographs of the various fabric types used in the experiment: car seat cover material (100% polyester) (A), plain woven cotton (100% Egyptian cotton) (B), denim (100% cotton) (C), and fleece (100% polyester) (D)
Second marbling attempt, made using men's shaving cream as the base for the ink to sit on. Again, I was attempting to emulate fabric when viewed under a microscope, and I think in terms of the shapes that this attempt formed, it did a better job than the previous one.
Third marbling attempt, also made using men's shaving cream. Unfortunately, I did not swirl the ink enough, nor did I add more, alas the final print looks like a smudge rather than deliberate lines.
Fourth marbling attempt, using the Marabu ink. This was my least favourite piece out of all the prints, solely because of the dull colours that ended up on the fabric. This print also did not convey my theme of viewing lines at all, thus this attempt was a fail. I think if I had to do this all over again, I would add more drops of colour and swirled them around even more, I could also maybe add more black to balance it out.
Fifth marbling attempt, using boiled cornstarch as the ink base. Using cornstarch was an interesting experience, but I prefer the result of swirling the ink onto the cornstarch base, rather than when I placed a sheet of fabric over it to transfer onto the fabric. When transferred, the watery effect and smudges did not look as well as it did when it was in the white tray, and my topic shone through better before.
Marbling as shown in fashion
Marbling in architecture
Reflection on Marbling:
To convey the image of fabric under a microscope through this technique was both challenging and intriguing. Marbling appears to be a captivating blend of artistry and science, where pigments are delicately floated on a liquid surface to create intricate patterns reminiscent of natural phenomena.
Considering the task of translating the microscopic details of fabric into marbled patterns, I realize the need for creativity and interpretation. My theme reveals a hidden world of textures, fibers, and structures that are invisible to the naked eye. Capturing these minute details through marbling requires patience and having technical skills.
While I'm eager to experiment with marbling, I'm also aware of the challenges it presents. Achieving precise patterns and controlling the dispersion of pigments on the liquid surface will undoubtedly require practice and patience. Nevertheless, I see each attempt as an opportunity for learning and growth, with the potential for unexpected beauty to come out of this experimentation of colors and forms.
By combining different colors, techniques, and tools, I anticipate being able to create unique patterns that evoke the texture and appearance of intricate lines of threads. In summary, the prospect of trying marbling for the first time to convey the image of fabric under a microscope fills me with anticipation and excitement.
Year 1, Semester 2 week 2 & 3
Laser Cut &
Engraving
Lasers have been used in apparel industry from nineteenth century for various garment manufacturing applications. There are several advantages of using laser over the conventional processes in cutting, engraving, embossing, denim fading and other applications. In addition, product damage potential is reduced, no/less consumables are needed and no problem of toxic by-product disposal as found in some processes. Today’s laser equipment is a result of continuous research and development of earlier products, which has undergone several changes.
However, the modern laser systems are simpler in operation and maintenance. Furthermore, the earlier systems were involved with more safety issues and needed the gasses to be constantly replenished. The garment manufactures around the globe should take the advantage of laser application in the post multi-fibre agreement regime to make their products more competitive.
History of laser cutting
Laser is being used in apparel industry from ninenteenth century. Recently the use of laser in apparel industry is increasing in cutting garment patterns, patterning designer neckties, 3D body scanning, denim fading and engraving leather.
The major reasons for wide application of laser in garment industries may be due to reduced cost, flexibility and anti-counterfeiting. For example the artwork of high-end necktie producers are digitally stored rather than physical patterns to lower the theft risk. When needed, the digital patterns are converted into physical samples using lasers.
Recently, the application of laser in denim engraving is increasing rapidly for value addition by replacing the traditional denim-distressing technics, which will take the denim segment to a height of sophistication that can never be realised by non-laser methods.
inspiration


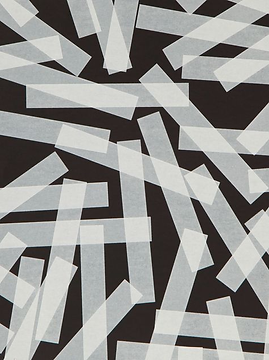


My Take on Laser Cutting
The pattern of fabric under microscope I'm trying to imitate
The original idea
In order to better simulate the messy look of fabric when viewed under a microscope, the original idea was broken down into three layers on Illustrator, while changing the sizes of the rectangles to vary in size so that they would appear more random when all layers are put together
Final result
In order to better simulate the messy look of fabric when viewed under a microscope, the original idea was broken down into three layers on Illustrator, while changing the sizes of the rectangles to vary in size so that they would appear more random when all layers are put together. I quite like the final result, however I think the effect could be further enhanced if I had used different coloured organza for every layer, from light to dark. I could have also thinned the rectangles and added more sporadically around the fabric, but was afraid of tearing the organza.
For the final final product, I added a layer of light blue organza to combat the same colours used throughout, and to see if having different colours would look different. As mentioned previously, I should have made the rectangles thinner instead so that the overall print would look even closer to my vision of fabric when viewed under a microscope. I thought that wrinkling and stretching the fabric would help with making the final look messy, but I think that effect would be better achieved should the colours be different.
My Take on engraving

Process

Outcome
When it came to engraving, I chose this dark grey thick denim fabric to engrave on, hoping that the laser will carve through deep enough to leave a lighter mark on the denim. Alas, the laser did not engrave in the way I wanted it to and so I was left with the outcome on the right side. The laser also did not manage to engrave my print all the way, thus leaving the bottom right part of the denim empty and leaving the lines going downward fading into nothing.
Reflection on laser cutting:
In my opinion, laser cutting offers unparalleled precision and control, allowing for the creation of intricate patterns and shapes with remarkable accuracy. Utilizing this technique to cut my organza into random rectangles introduces the emulation of trying to mimic threads as seen on fabrics.
By layering these laser-cut fabric rectangles, a sense of depth and dimensionality is achieved, echoing the three-dimensional structure of threads. The combination of light and shadow on the fabric surface adds another layer of visual interest, enhancing the illusion of texture and form.
Beyond its aesthetic appeal, this approach invites deeper contemplation of themes such as perception and scale. Finally, the concept of this laser cutting exercise offers a captivating avenue for artistic exploration and conceptual inquiry as it bridges the gap between technology and tradition.
Reflection on engraving:
Using denim as the canvas for this creative endeavor adds a layer of depth and texture to the exploration. Denim, with its rugged yet versatile nature, serves as a fitting medium for capturing the essence of threads under a microscope. Through engraving, the fabric takes on a new feel, transformed into a canvas for intricate patterns and textures.
Engraving fabric on denim to emulate threads under a microscope offers the randomness of the rectangles that mirror the irregularity found in natural fibers, creating a sense of authenticity and depth in the artwork.
Through engraving, denim is elevated from a utilitarian material to a medium for artistic expression. It becomes a canvas for storytelling, a reflection of the artist's vision and interpretation of the world around them.
Finally, I think that with better preparation and with better fabric (one that is not thick denim), my engraving would have a better outcome. If I were to do this all over again, I would have better thought through my base fabric options and how it will properly convey my vision.
Year 1, Semester 2 week 4 to 10
Weaving
What is Weaving?
Weaving is the textile art in which two distinct sets of yarns or threads - called the warp and weft - are interlaced with each other at right angles to form a fabric or cloth.
The warp threads run length-ways on the piece of cloth, while the weft runs horizontally. Cloth is woven on a loom, a device for holding the warp threads in place while the weft threads are woven through them, back and forth. Weft is an old English word meaning "that which is woven". Woven cloth can be plain (in one color or a simple pattern), or it can be woven in decorative or artistic designs.
Group work with Keane:
The sketch and initial idea
Initially, we wanted to weave a scarf, but thought that we should create something we would actually use, so we had the idea to weave a small bag to hold essentials like a phone, wallet, keys, earbuds. When approaching the colours, we went for a combination that would suit both of our aesthetics, and so we chose black, greys and white, and a splash of red for a pop of colour.
Keane suggested we add carabiners onto the bag, and I was on the fence with the idea until he showed me a rough sketch (as shown in the left pic) of what the final product would look like.
The red lines were to be made with embroidery thread, and they are supposed to represent my topic of having lines going in random directions.
With this idea in mind, we bought about 12 carabiners from Daiso, and black, white, light grey, and dark grey yarn from Spotlight, and set to work.
process
We decided on doing contrasting bases, so I start with a white yarn base, while Keane has a black yarn base, and so we set off to weave nearly identical patterns onto our bag.
We wove at the same time and pace so as to ensure that we were both on the same number of yarn to weave through, and to ensure that they both look as similarly to one another as much as possible.
final outcome

Han (left), Keane (right)

On body
By the end of Week 10, we were both done with out matching woven bags. Mine, the one on the left, ended up being slighting bigger than Keane's due to me accidentally weaving a few more yarns than he did. But eventually, the outcome ended up similar to one another. After successfully weaving this mini bag, I realise it was truly a testament to patience, having an attention to detail, and being creative.
Weaving is about having the dedication in mastering the intricacies, and having the persistence to overcome any challenges we have come across, such as when we were weaving the slopes of the colours to fade into them, and the joy of bringing our unique vision to life. Completing this woven bag brought me a profound sense of accomplishment as someone who has never even seen a weaving loom.
How I would style our bag
1
2
3
With the final outcome of our bag, I envisioned a specific aesthetic suitable for the bag. Though of course anyone with different aesthetics could style our bag, I think something a bit more edgy would be a better fit. Thus, I styled the bag with three black and white outfits and accessories that I think go well together.
Year 1, Semester 2 week 5
Smocking
Smocking is an embroidery technique used to gather fabric so that it can stretch. Before elastic, smocking was commonly used in cuffs, bodices, and necklines in garments where buttons were undesirable.
Smocking was developed in England and has been practised since the Middle Ages and is unusual among embroidery methods in that it was often worn by laborers. Other major embroidery styles are purely decorative and represented status symbols. Smocking requires lightweight fabric with a stable weave that gathers well. Cotton and silk are typical fiber choices, often in lawn or voile.
Reflection on weaving:
Initially, the idea of weaving seemed daunting to me. I had no knowledge of the techniques involved or the intricacies of handling the materials. However, through collaborative effort and mutual support, Keane and I navigated the challenges of weaving, exchanging tips, troubleshooting problems, and celebrating small victories along the way, especially when having successfully woven the gradual slopes.
Despite encountering moments of frustration and uncertainty, I found that perseverance and patience were key in completing this artifact properly. Mistakes became opportunities for learning, and setbacks fueled our determination to improve. With practice, guidance, and time, we both gradually gained confidence in our weaving abilities.
Finally, completing the small bag felt like the greatest achievement we're ever had. Holding the finished product in our hands, we marveled at how far we had come since the beginning of the project, especially when we were so confused on how we were even going to start. Beyond its practical usage in bringing small essentials, the bag symbolized the culmination of weeks of hard work, learning, and collaboration.
In retrospect, weaving this small bag was not just about mastering a new skill; it was about embracing the spirit of exploration and creativity.
Smocking is worked on a crewel embroidery needle in cotton or silk thread and normally requires three times the width of initial material as the finished item will have. Historically, smocking was also worked in piqué, crepe de Chine, and cashmere. Fabric can be gathered into pleats in a variety of ways. Early smocking, or gauging, was done by hand. Some embroiderers also made their own guides using cardboard and an embroidery marking pencil.
Smocking is done before a garment is assembled. It usually involves reducing the dimensions of a piece of fabric to one-third of its original width, although changes are sometimes lesser with thick fabrics. Individual smocking stitches also vary considerably in tightness, so embroiderers usually work a sampler for practice and reference when they begin to learn smocking. Traditional hand smocking begins with marking smocking dots in a grid pattern on the wrong side of the fabric and gathering it with temporary running stitches.
These stitches are anchored on each end in a manner that facilitates later removal and are analogous to basting stitches. Then a row of cable stitching stabilises the top and bottom of the working area. Smocking may be done in many sophisticated patterns.
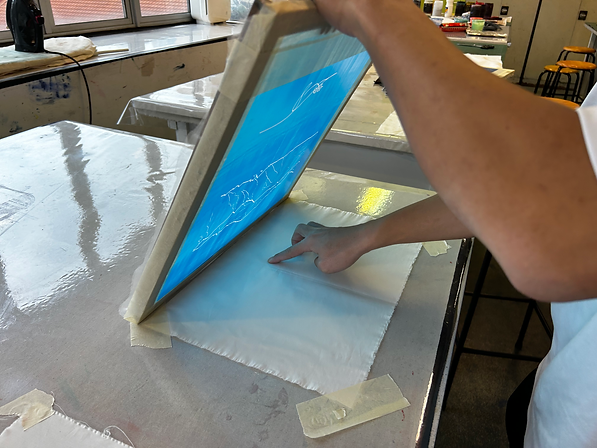
Year 1, Semester 2 week 7, 8, 9
Screenprinting
Screen printing is the process of pressing ink through a stencilled mesh screen to create a printed design. It’s a popular technique used in a whole range of different industries, so even if you've never heard of the term before today, it’s likely that you’ve worn or used a screen-printed product at some point without even realising. The process is sometimes called serigraphy or silk screen printing, but all of these names refer to the same basic method.
Screen printing is an effective technique for creating bold canvases, posters and artwork, but the method can also be used to print fabrics and textiles, so it's great for creating all sorts of custom clothing and products.
Screen printing is the process of transferring a stencilled design onto a flat surface using a mesh screen, ink and a squeegee. Fabric and paper are the most commonly screen-printed surfaces, but with specialised inks it’s also possible to print onto wood, metal, plastic, and even glass. The basic method involves creating a stencil on a fine mesh screen, and then pushing ink (or paint, in the case of artwork and posters) through to create an imprint of your design on the surface beneath.
The process is sometimes called 'silk screening' or 'silk screen printing' and while the actual printing process is always fairly similar, the way the stencil is created can vary, depending on the materials used. Different stencilling techniques include:
-
Using masking tape or vinyl to cover the desired areas of the screen.
-
Painting the stencil onto the mesh using 'screen blockers' such as glue or lacquer.
-
Using a light-sensitive emulsion to create a stencil, which is then developed in a similar way to a photograph.
Designs made using the screen printing technique may use just one shade of ink, or several. In the case of multicoloured items, the colours must be applied in individual layers, using separate stencils for each ink.
exposing on the wooden frame
T-shirt 1 - back print
As someone who has done something similar to screen printing before, which was printmaking using linocut, wood, dabbing on the ink itself, and etc, screen printing is not something I'm so unfamiliar with. There are certain aspects of this exercise which are similar to the methods that have been taught to me before, such as having to roll or slide the ink over the exposed print such that the surface underneath it would be able to absorb the print.
This t-shirt that we printed on was a result of both Keane and I's efforts. We had to redo this print as we had originally messed up with the foil printing on the red leopard as shown in the artwork below.
The reason why we have the vision of having the leopard overlay the mountain scape, was a cultivation of both of our topics, mine being dumbed down into random lines, and Keane's revolving around snow leopards.


In the picture on the left, we did a test print on a small piece of fabric before we touched our own t-shirts to print on them, not wanting to make a careless mistake like forgetting to close an exposed gap in the screen. After the test print came out clean, we set to work on our actual clothing as shown in the picture on the right, as we wanted to be able to wear these t-shirts out in public.
Instead of following the same way we printed the background and the leopard, we had the idea to replicate the background twice, to mirror one another as though the mountains are seen reflecting on a body of water. After we printed both backgrounds, we used glue foil to print the leopard atop the mountain scape.
T-shirt 1 - front print


In order to not let the back print feel alone, we printed the front side of the t-shirt using our repeat fangs pattern. We settled on only doing it once to balance it out with the print on the back.
HOODIE 1
