Learning Journal for BA(Hons) Design Practice
By Hani Batrisyia (Domain: Fashion)

pattern making & draping
Lect: claire
YEAR 1 SEMESTER 1
YEAR 1 SEMESTER 2
Anatomy of fabric

Week 1
INTRODUCTION TO DRAPING & DRAPING EXERCISE 1
The anatomy of fabric refers to all the various components, directional terms, and characteristics of any piece of fabric.
1. Selvage
Each length of fabric cut off a bolt will have 2 selvages. The selvages are across from each other on either end of the width of the fabric. Selvages run parallel to each other for the whole length of the bolt. They are also a thicker and tighter weave that prevents the two selvage edges from fraying or unravelling.
Selvages can look different based on the type of fabric, but they are identifiable in a few ways:
-
On printed fabric, the selvage often contains writing that lists the manufacturer, designer or design name. Sometimes they also list the date, country of origin, or the fabric collection. Helpfully, some selvages contain little circles showing the various colours used in the design, which can help designers to choose coordinating or contrasting fabrics.
-
The selvage might also be thicker and a different colour than the rest of the fabric.
-
On a solid colour fabric, you might see the slightly tighter weave of the selvedge with little holes above it.

Selvage - The side that doesn't fray
2. Warp & weft
Woven fabrics are woven from fibres going lengthwise and going crosswise – under and over each other. Warp fibres run the length of the fabric (the entire bolt), and parallel to the selvages. Weft fibres are much shorter, going perpendicular to the selvage, or across the width of the fabric.


3. Raw edge
The raw edge can refer to a few similar things. First, it means the initial cut edges to cut a length of fabric from the bolt, perpendicular to the selvages. If it is a woven fabric, these edges can fray, or unravel.
The raw edge can also mean the edge of any piece or shape of fabric where you cut it into a shape, and where the edges can continue to fray. Sewing patterns often tell you to finish the raw edges so that the threads do not continue to unravel as you wear and wash your garment.

4. "Right" side & "wrong" side
On many fabrics, a right side is very apparent. Generally, the right side means the printed side, or the side that looks better. The right side will be the side that will be visible at the front or outside of your projects.
Other fabrics such as solid coloured quilting cottons and linens for example, do not look noticeably different on either side. In that case, it doesn’t matter which side of the fabric becomes the right side.
If the right side is the pretty side, then the wrong side is the side of a fabric that looks worse than the other, or the side that is unprinted. As mentioned with the right side, some fabrics look the same on both sides.

4. Grainline
The grainline usually refers to the same direction as warp threads, running lengthwise down the fabric. Sometimes it might be specified as a crosswise grainline, in which case it refers to the weft threads running across the width of the fabric.
When sewing clothing, particular pattern pieces must be laid out carefully, often with an arrow running in the direction of the grainline, or down the length of the fabric. This is important for the fit and drape of a finished garment.

Within the fashion industry, fashion designers, dressmakers, and anyone else who designs, makes, and sells clothing may use the following terms:
-
A-line: A dress or skirt silhouette that is narrow at the top, around the waistline, before flaring out at the hemline. It makes an A-shape silhouette.
-
Embellishment: This is a decorative detail on the fabric of the garment, such as appliqué, embroidery, sequins, or fastenings.
-
Hemline: Hemline refers to the lower edge of the garment. A hemline can hit the thigh, the knee, the ankle, or the floor.
-
Inseam: This usually refers to the seam area inside the pant leg, from the crotch to the hemline. It can also refer to the seam area on the sleeve, from the armhole to the sleeve hem.
-
Neckline: The neckline is the top edge of a top or a dress, usually around the neck. There are various neckline cuts, such as a bib neckline (where there’s an extra piece of fabric sewn to the front), boatneck, halter, off-the-shoulder, plunging, and V-neck.
-
Sleeve: A sleeve is the part of a clothing item, whether a dress, T-shirt, blouse, jacket, or sweater, that covers the arm. Sleeves are attached to the armhole of the garment. Sleeves can be tight or loose-fitting, long or short. Examples of sleeves include cap sleeves, bell sleeves, dolman/batwing sleeves, and raglan sleeves.
-
Waistline: This term applies to dresses or long garments covering the wearer's upper and lower half. The waistline is the line that demarcates the upper and lower half of the garment. The waistline can hit just below the bust, such as in an empire waist, or below the natural waist, called a drop waist.
-
Evening wear: This describes a dress code for formal events, such as a gala or a wedding. Evening wear is usually bespoke for the wearer and more expensive than daytime casual clothing. Examples of evening wear include an evening gown, a wedding dress, or a tuxedo.
-
Haute couture: Haute couture includes high-end clothesmaking where clothes are usually made by hand from start to finish, with custom tailoring for the wearer. Haute couture is also made in small batches, with limited-edition merchandising, and is much more expensive than ready-to-wear clothes. Special retailers sell haute couture, also known as high fashion.
-
Ready-to-wear: “Ready-to-wear” (known as prêt-à-porter in French) is a fashion industry term that signifies that an article of clothing was mass-manufactured in standardized sizes and sold in finished condition—rather than designed and sewn for one particular person. Retail stores sell ready-to-wear clothes in standard sizes rather than tailoring items for the wearer. Ready-to-wear garments tend to be trendy and switch out from season to season.
-
Outerwear: Outerwear refers to clothing worn on top of an outfit, usually to protect the wearer from the environment. Outerwear typically features heavier fabrics than clothing worn directly on the body. Outerwear can include a trench coat, a quilted puffer coat, or a wool coat.
-
Sportswear: Sportswear or activewear is ready-to-wear clothing for working out or casual day wear. Sportswear can include drawstring pants, sweatpants, sweatshirts, hoodies, and sneakers.
Taping my Tailor Dummy
Speed-run of me taping my chosen tailor dummy, with the actual footage being about an hour long.
Why is taping a tailor dummy important?
Placing tape is an important stage to carry out when working on a dummy as it involves locating the construction lines required in the making of a balanced garment and ensures that the latter hangs and fits well once made up.
Steps

Taping the bust, waist, and hip line.

Taping the armholes.

Taping the centre-front line.

Taping the front princess line.

Taping the centre back and back princess line.

Taping the side seam.

Taping the shoulder and neckline.

Finish.
Taping reflection:
Before we started, I wondered what was the point of having to re-tape the tailor dummy when the ones we chose already had the tape, and what was the point of the exercise in the first place as I thought it was just lines with no insignificance. As we were explained to regarding the taping however, I realised that as up-and-coming fashion designers, we had to learn the absolute basics of a tailor dummy's purpose, which is to point out where the armholes, centre front/back, princess lines, etcetera, are, and that to re-tape the dummy is to ensure that we understand its purpose. As someone from an illustration background, I've never once seen a taped tailor dummy, thus I was completely at a loss, but as the lesson went on, I realised the importance of starting from the basics.
Draping
What is draping?
The process of positioning and pinning the fabric on a dress form is called draping. Draping can be used to create the basic pattern or to design organically by playing with the fabric on the form. By working with the fabric directly on the form and seeing the effect of every single adjustment, draping has also helped me have a better understanding of drafting, which is making the pattern based on body measurements. Draping can be used to create the basic pattern or to design organically by playing with the fabric on the form which is a lot of fun.
How is draping a necessity?
-
To understand the human body proportions also get the required shape and fit of the garments.
-
To understand about various fabric grains and its advantages
-
To introduce the basic vocabulary of the fashion such as – high waist, empire line, low waist, princess line, style line, Halter, etc.
What are the steps needed before draping?
Tearing/Cutting of the fabric:
-
Estimate the size of calico needed, allowing a reasonable amount of extra fabric for ease.
-
Clip the edge of the calico with scissors and tear across the grain with sufficient pressure to break the yarns evenly.
Blocking:
-
Before draping, calico may have to be re-shaped so that yarns of the crosswise and lengthwise grains are at perfect right angels to each other. To re-shape calico, pull the edges diagonally until the fabric is squared.
Pressing:
-
Once the fabric has been blocked, iron out the fabric to release creases and wrinkles.
History of Draping
Draping is the process of transforming a clothing design into a three-dimensional form. The art of draping dates back to 3500 BCE, beginning with the Mesopotamians and Ancient Egyptians. Greek fashion followed with the invention of draped silhouettes like the chiton, peplos, chlamys and himation. The Etruscans and Ancient Romans invented the toga, a length of fabric that wraps and drapes around the body.
Throughout the ages, clothing was categorized as either “fitted” or “draped.” A “fitted” garment would be sewn together and worn close to body, in contrast to a “draped” garment, such as a toga that doesn’t require sewing. In today’s fashion world, both fitted and draped garments can be patterned using the draping process.
Draping has been the hallmark of several famous designers beginning with Madame Grès, known as the “Queen of the Drape”. Her expertly draped and executed collection of Grecian-inspired silk jersey dresses consumed over 70 yards of silk jersey each. Madame Grès and French-born, American designer Pauline Trigère, were both known for draping their designs directly on live models instead of dress forms.
Madeleine Vionnet, in contrast, chose to initially test her designs on a miniature mannequin instead of on a full size form. Vionnet’s claim to fame is her mastery of the “bias cut,” which resulted in the most sensual designs that are still a source of inspiration to designers to this day.
Why use draping?
Designers love the art of draping because their designs come to life as they manipulate the fabric on the dress form. Even though a designer may start out with a design sketch, during the draping process a new and more interesting design usually takes shape. This is why draping is considered the more creative method of pattern making.
Unlike the 2-dimensional pattern making process, draping allows the designer to get a “feel” for the fabric as the fabric is draped on the form. Draping enables the designer to make better choices when considering the suitability of a particular fabric to its design.
Steps to create a basic dress drape
Preparing calico:
1. Measure HPS (high point shoulder) to bust point and bust depth (front and back bodice)
2. Add 10cm to the length
3. Note down bust level
4. Fold calico 3cm along the length
5. Mark 1.5cm down from front and back neck (X)
6. Square bust level

Front bodice drape
1. Place calico at CF (centre front) and pin the neck, bust bridge and waistline
2. Smooth calico from CF (centre front) to bust point and to SS (side seam)
3. Smooth calico upwards from bust to shoulder
4. Crossgrain of the side falls downward creating a flare under the bust
5. Smooth calico upward from bust to Nk/L (neckline), slash shoulder, and pin.
6. Create shoulder dart.
7. Create waist dart. Slash below W/L (waist line) where appropriate.

Back Bodice Drape
1. Place fold of calico at CB (centre back) and pin neck, crossgrain line and waist
2. Smooth calico from CB (centre back) to bust point and to SS (side seam)
3. Smooth calico upwards from bustline to shoulder
4. Create shoulder dart
5. Create waist dart. Slash below W/L (waist line) where appropriate
Basic bodice drape reflection:
As this was my first ever draping exercise in my life, I tried my best to keep up with the given instruction as I attempted the exercise. I was pretty nervous when cutting the fabric after tracing the outline for fear of cutting too much and having to re-do the front bodice. Same goes for when it was time to work on the back bodice, I was afraid to cut both pieces as I wasn't confident that their measurements would match and that they'd look crooked in the end. Regardless of my fear though, at least I managed to learn the importance of draping and how this knowledge would later assist me in my final project for the semester.
Week 2
Asymmetric Wrap Blouse
Calico measurements: 90cm x 80cm

Draping Process


_HEIC.png)
First step was to tape where the blouse would go, the wearers left and right. Then, start draping the calico starting with the wearers left, making a dart from the bust point to the centre front, and then the wearers right, making gathers on them. At first, I made my gathers a bit too high (going past the tape for the wearers right), so I had it adjusted such that it lays between the top and bottom tape guide.


Starting on the back, it was really simple and straightforward. Making a dart from the bust to the hip line and marking all around, half of the back was complete. As for the other side, we traced using carbon paper and tracing wheel for accuracy and to spend less time.
Truing and cutting
When it came to truing the pencil lines I drew, I was afraid that I wasn't accurate enough and that when I cut and drape it on my tailor dummy, there would either be access fabric or not enough of it.


Starting my truing with the wearers' left of the asymmetrical top.


Next was the back. After truing half of it, I folded it in half and then used the carbon paper and tracing wheel to trace the other half to ensure that both sides are equal.


Truing the wearer's right with the gathers. At first I was confused and overwhelmed when trying to attempt this step, but after a few deep breath, I was ready to overcome the gathers. After truing every line made on the fabric, I sewed through the gathers line and started pulling and creating gathers on it as I go. Eventually, I was able to pull the calico such that I could replicate the gathers I made on the drape, and after tying a knot on the thread, I cut it off, and secured it.


After everything was cut out, it was time to drape it back onto my tailor dummy, starting with the wearers' left, wearers' right, and finally the back. As shown in the video, my side seams don't match up, and I realized that it may be due to the fact that I stretched the back piece downward too much, and it messed up the side seams such that they do not match with the wearer's left and right
Asymmetrical wrap blouse reflection:
Out of the draping exercises we've done, I like this one the most. Simply because the end result looked good and I had a hard time taking it down to continue onto the next drape. I was disappointed that the side seams did not match perfectly, but I was told that the marks will not always match and that I'd have to just keep practicing and pushing onward. After learning about the importance of taping the tailor dummy, I learned not to question the experts and realised that it is indeed helpful in draping as it helps to identify the waist line, bust line, side seam, and more. It also assists to identify the wrap in this blouse.
Week 3 - Cowl Drape


What are cowls?
A cowl is:
1. A large loose hood, especially one forming part of a monk's habit.
-
A monk's hooded, sleeveless habit.
-
A cloak with wide sleeves worn by members of Benedictine orders.
2. The hood-shaped covering of a chimney or ventilation shaft.
Cowl is loosely draped bias folds of fabric. It can be created on front and back neckline of dresses, skirts, pants and even on armholes. It gives an elegant look for the garment. There are many verities of cowls such as low cowl, high cowl, mid depth cowl, pleated cowl etc. Material used for cowls should drape well, such as chiffon, knitted fabric or any woven material which is supple enough to drape is suitable.

Draping Process and Truing


Starting off with draping the front! I felt that this was a little bit complicated because the calico was not working well with me, in the sense that it was a little tough to manipulate the fabric to create the folds as shown. Working on the back part of this exercise was so much easier though, and also pretty fun.


When draping the back, I had to cut random parts of the excess fabric as shown to allow the calico to drape more freely and without restrictions. Draping the cowls was quite fast, and soon enough it was time to cut the fabric out. I started by sketching out the shoulders, side seams, and the hem, and then performing truing on them, leaving ample space for the cowls.


Time to drape the cowl top again! I enjoyed this part the most as I would get to see it becoming an actual garment. I made the mistake of cutting the armhole in the way that I have in the pictures above, forgetting that they were not supposed to be that way, but I will keep that in mind when draping future garments. When matching up the side seams, there seem to be minimal problems this time unlike the previous exercise (asymmetrical top).
Cowl drape reflection:
Honestly, I think I've gotten better at draping since the first exercise when it comes to outlining the blouse. When it comes to the actual cowl draping however, especially for the back, that's where I struggled a little bit. Pleating the shoulders and having it hang downwards was simple, but I had to make sure there was ample space at the bottom of the cowls so that it'll lay nicely against the centre front line that I drew.
I think this is the exercise where I realize that draping is actually....kind of fun. Of course, I only had that realisation on the final draping exercise... I still have a lot of room to improve on my draping, but I felt pretty good about how the blouse turned out, aside from accidentally cutting the arm holes.
Given the chance, I would like to practise my draping more to ensure accuracy when lining up the side and shoulder seams, and even just to get to the point where I am fully confident in draping that I wouldn't have to doubt myself on whether what I am doing is right or not.
Week 4 & 5 - basic block, Drafting, and cutting
What is a basic block?
A Block, also called a Sloper is the Master or Foundation Pattern that is used to make other patterns and other blocks. A full set of Basic Blocks usually consists of: Bodice Front & Back, Sleeve and Skirt Front & Back. Using these blocks while applying the principles of patternmaking allows you to make sewing patterns. From these basic blocks you can also make derivative blocks, such as Sleeveless, Torso, Extended Line Dress, and others. You can also create other blocks from scratch, such as an Overgarment Block, Jacket Block, or Jeans Block.
Patternmakers in the Fashion Industry use these blocks to make patterns for their clothing line; their particular blocks will be made for their target audience; e.g. if that fashion line makes clothing for curvier figures, their blocks will be different to another fashion house that makes clothing for a less curvy shape. The measurements used to make blocks will therefore vary from fashion line to fashion line, but they get their measurements in some way or other from anthropometric data.

Front Bodice

Back Bodice

Sleeves
Why use Blocks?
Using Blocks means you don’t have to create every pattern from scratch. The Basic Blocks have no design features other than what is required for fitting. This means it has only minimum ease – called wearing ease, and the only features are darts required for shaping the garment to the body. Extra ease (design ease) and features are added when creating patterns from the block.
The Basic Bodice Block
The Front of a basic Bodice Block usually has two darts. A one-dart block can be created, but usually only because it is easier to create the initial block that way; once made, you would then create a two-dart block from that, and use the two-dart block to create patterns. Having only one dart in a bodice block (unless you have a very small bust), creates distortion. The bigger the bust cup, the bigger the distortion.
What is drafting?
Drafting is the process of creating a blueprint of your garment. A pattern is used as a template to cut out fabric that matches the required specifications to sew a garment. It factors in the type of fabric, the intended fit on the wearer, and any trims that will be used. The pattern is used to make 2D fabric sit properly on a 3D body.
It involves measurements derived from sizing systems or accurate measurements taken on a person, dress or body form. Measurements for chest, waist, hip and so on, and ease allowances are marked on paper and construction lines are drawn to complete the pattern. Drafting is used to create basic, foundation or design patterns.
Drafting Blouse with Peter-pan Collar


Front and Back Bodice Master Plans and Final Pattern
The main important part of the blouse, and also the most tedious due to how many measurements there are. Before starting on drafting, I used to think that it was easy. I watched people draft out their apparels but I always thought it was simple since at the end of the day, it was just drawing a life sized model of the garment.


Back Bodice (pleats) Intermediate Plan and Final Pattern
When working on the back pleats, it was imperative that I know exactly where the pleats would start and end. I was deathly afraid of making mistakes and did not want to run the risk of having not enough fabric for the pleats.

Back Yoke and Back Bodice Final Pattern
What is a yoke?
A yoke is a shaped pattern piece that forms part of a garment, usually fitting around the neck and shoulders or around the hips to provide support for looser parts of the garment, such as a gathered skirt or the body of a shirt. Yoke fabrication was first widely done in the 19th century. Bodice yokes were first made in the 1880s, while the yoke skirt, a skirt suspended from a fitted hip yoke, was first produced in 1898.


Arm Sleeves Intermediate Plans
Drafting the sleeves were pretty simple and quick to the point, and I learned that drawing a squiggly line across indicates the forming of gathers on the fabric.


Godet Intermediate Plan
What is a godet?
According to definitions from Oxford Languages, a godet is a triangular piece of material inserted in a dress, shirt, or glove to make it flared or for ornamentation.
Elaborately, a godet is an extra piece of fabric in the shape of a circular sector which is set into a garment, usually a dress or skirt. The addition of a godet causes the article of clothing in question to flare, thus adding width and volume. The most popular use of godets is in petticoats. Adding a godet to a piece of clothing also gives the wearer a wider range of motion.


Collar Intermediate Plan
One of the final drafts in preparation for the actual sewing of the garment, and also the most important seeing as it is in the name of the garment we are creating.
Reflection:
Finally, end of the first week of drafting the same blouse that all of us are sewing. I used to think that I was great at measuring things and having full accuracy, but now I couldn't be more wrong in that. Human errors were inevitable, but I made do with my measurements, regardless of some being off by a few centimeters.
I used to think that drafting was easy, because at the end of the day it's just shapes. What's so hard about shapes? I never realized the amount of measurements it took from a basic block to a proper garment.
The art of drafting this blouse has been a delightful journey into the world of classic elegance and sartorial craftsmanship. The Peter Pan collar, with its soft, rounded edges, immediately conjured images of classic literature and vintage style. Drafting the pattern was a meticulous process that involved translating the two-dimensional sketch into a three-dimensional garment. Every curve, seam, and measurement had to be carefully calculated, and I was so afraid of the measurements not lining up with one another once it was time to sew the garment.
Drafting has taught me the value of precision, the art of translating a vision into a tangible creation, and the beauty of classic design. This journey of drafting and creating this blouse has left me with a deeper appreciation for the art of fashion and a desire to continue exploring the rich tapestry of creativity.
week 6 to 9 - sewing the final blouse
Winding Bobbin
It goes without saying that before sewing, one must prepare the necessities needed, and one of it is to wind the bobbin that goes under the machine. As I have a sewing machine of my own, I know how important it is to always have a fully winded bobbin. In the event that it runs out, it becomes an inconvenience when you are halfway through sewing.
The steps I memorized for my own machine are completely different than that of the machines we use in school, given that I have the domestic beginners one. It does not take too long to remember how to wind the bobbin for the school's industrial machine though, and it is actually quite pleasing and satisfying watching the bobbin get winded with only the press of my foot.


1. Sewing the Front Bodice Darts
Our first step was to sew the darts on the front bodice of our blouse. We sewed a straight line as marked on the wrong side of the top and pressed the top down with a heated iron to set the stitches.


2. Sewing the Pocket
Sewing the singular pocket that rests on the wearers left bust was simple and satisfying, especially when sewing the gathers at the corners to make it easier to fold the seam allowance. When I was done sewing the pocket onto the blouse, I thought, "Wow, this is my reality now. This is just one of many more pockets that I will keep sewing as I go on."
It is strange how sewing just one simple pocket is enough to make me feel accomplished.


3. Sewing the Front Bodice Top and Middle
Now this is where my movements stagger a bit. I was confused when having to alternate between the criss-cross pattern, but after sewing halfway through, I finally got the hang of it.


4. Sewing the Front Bodice Middle and Bottom
In my opinion, sewing the curves was much easier than the previous step. It was actually quite enjoyable having to manoeuvre the fabric such that I would be able to sew the curves, and it took me a shorter time to complete this step as compared to the one before.


5 & 6. Sewing the Godet and Collars
Sewing these pieces were very simple and straightforward, especially the godet. The collar was also fun to sew, and it felt rewarding when flipping it inside out to see that I had sewn it pretty well.


7. Sewing the Sleeves (Gathers and Normal), and overlocking them
This was the start of using the overlocking machine, also known as a serger. Sewing the side seams, hems, and preparing the gathers for the wearers' right were straightforward. However, when it came to using the overlock machine, that was where I was anxiously shaking a little bit, afraid of making a mistake that I could not undo. My worries lasted a short while though as I slowly ran the sleeves through the machine, and I realised that I would not make a mistake if I were to go at it at a gradual pace.


8 & 9 . Sewing the Yoke, the Gathers, the Pleats and Overlocking them
This was the moment I felt a rush of exhilaration, knowing that I was halfway through completion. It was very nerve wracking when overlocking the sewed up back piece, especially when encountering the gathers. As shown in the video, I was going at it at a snails pace, but it was worth it in the end as I managed both back pieces smoothly.


10. Overlocking the Front Bodice Top, Middle, and Bottom pieces & Adding Topstitches
Going back to the front piece of the blouse, I sewed the finishing touches, which was to overlock the stitches and add topstitching as decoration. I wish I had the thought to change the colour of the thread so that the topstitching would be more obvious, but unfortunately that did not cross my mind. No matter though, I still think the white looks beautiful and clean against the off white colour of the calico.


11. Overlocking Both the Back Centre Front
In preparation of adding the invisible zip onto the centre front of the back piece, we had to overlock the fabric. This step was smooth sailing, as I was already getting used to the unpredictability of the overlock machine and it's speed (or lack thereof seeing as there is no speed control knob).


12. Overlocking the Godet and Sewing it to the Back Centre Front
Overlocking the godet was very fast and straight to the point, seeing as it was just a straight line. After those steps were completed, we sewed the godet onto the back centre front where it splits into to sides, and thats half of the back piece done.


13. Sewing the Invisible Zipper onto the Back Centre Front
From this point on is where things get rocky. Having to position the zipper was a challenge in itself, as I had to ensure that it would zip up properly and actually be hidden as the name of the zipper suggests. We had to change the presser foot of the machine to the invisible zip presser foot, and place it such that the platicy part of the zip rests just under it. After that, it was a straight stitch until the marked end of the zipper.


14. Sewing the Shoulders
Sewing the shoulders was simple, as it was just to run a straight stitch of 1cm across from the neckline to the armhole. After that step was done, it was back to the overlock machine.


15. Sewing the Collar to the Blouse
After we sewed the collar onto the blouse, we were not done with it yet. We had to sew on the bias tape onto the neckline and collar to hide the frayed fabric. Sewing the bias tape was apparently meant to be challenging, but I encountered it with ease. I thought that I must have done something wrong, because sewing the bias tape onto the neckline and collar was smooth sailing, but after checking for the millionth time, there were no errors.


16. Sewing the Side Seams
On the wearers' left, we sewed a french seam for the side seams. What is a french seam? French seams are sewn twice, encasing the raw edge within the seam and creating a very neat, delicate seam that is ideal for sheer or lightweight fabrics. As for the wearers' right, we sewed a normal straight stitch downward, leaving the raw edge as is and overlocking it after.


17. Sewing the Hem
Almost heading towards the end now, we sewed the hem by folding it up 1cm twice to create a neat hem, We then sewed an edge stitch all the way, and then pressing it down with the iron.


18. Sewing the Sleeves to the Blouse
The last step! Sewing the sleeves was quite challenging, seeing as we had to match the notches that we made to the armholes on the blouse, while also matching the seams on the underside of the blouse to the side seams. Before sewing, we placed the sleeves such that the right side of it was facing the right side of the blouse, and pinned it where the seam allowances laid. After sewing the sleeves, we used the overlock machine so that it would look much neater.
Final!

Front

Back

On Body
Sewing Reflection:
Finally starting on our sewing! I have prior experience in sewing, though only a little bit, due to having my own (beginners) sewing machine in my room. I've never actually made a garment, but I've done a little bit of reworking with my own garments just to spice them up a bit. My sewing machine is the domestic one though... so the transition from that to the industrial machines we use in our studio is quite a big jump. Surprisingly, they're much more easier to use and they also have speed control, which my own machine doesn't have.
Blouse Completion Reflection:
There's something so fulfilling about completing something you've worked tirelessly on for weeks, even if what you busied yourself over was really just one simple thing - like a shirt/blouse. My first thought when I saw the sample of the blouse was,
"Oh that looks easy. It's just a shirt, it can't be that difficult to pull off."
I was expecting to eat my words but honestly, it really was not that hard. Tedious, yes, because I've never attempted to make a garment from scratch before, and there was a lot of information to consume (such as sewing techniques, methods, etc.) but I managed to pull through quite fast and still manage to help my classmates with their sewing of the blouse.
As I mentioned in the beginning, the feeling of accomplishment is palpable as I look at the finished blouse in my hands. It was like piecing together a puzzle with each part falling into place, and I was the artist of my own creation. Completing my first blouse has been an enlightening journey, filled with challenges, learning, and a deep sense of personal achievement.
I vividly remember the moment I decided to embark on this sewing adventure. I had always been drawn to the idea of creating my own clothing, but the idea of sewing seemed daunting. With no prior experience and only a vague understanding of what a sewing machine looked like, I was about to dive into the world of stitches and fabric.
As I tentatively fed the fabric through the machine for the first time, I encountered the inevitable tangles, broken threads, and a few less-than-straight seams. Frustration threatened to overcome my initial enthusiasm, but I reminded myself that every beginner faces these hurdles. With each mistake and misstep, I learned valuable lessons. I learned how to properly thread the machine, adjust the tension, and select the appropriate stitch length. The seam ripper became my closest companion, patiently undoing my errors and allowing me to start anew.
The process of creating my first blouse was anything but swift. I found myself repeatedly pausing, undoing stitches, and rethreading the machine. It was a lesson in patience and resilience. But as the seams slowly became straighter, and the hems neater, my confidence began to grow.
Completing this blouse was not just about creating a piece of clothing; it was about personal growth. I learned the value of patience, precision, and the beauty of taking one step at a time. This sewing journey has instilled in me a sense of self-reliance and a deep appreciation for the craftsmanship that goes into every piece of clothing we wear.
As I look at my completed product, I can't help but feel a sense of excitement for what lies ahead. This first project was a stepping stone, a foundation upon which I plan to build. I'm eager to explore more complex patterns, experiment with different fabrics, and continue honing my sewing skills, but most importantly, my journey of completing my first blouse has taught me that with determination and a willingness to learn, I can conquer new challenges, no matter how unfamiliar they may seem at the outset. It's a reminder that the joy of creation and the sense of accomplishment are well worth the effort it takes to get there.
This project has opened the door to a world of creativity and possibilities, and I can't wait to see where this newfound skill will take me.
week 10 to 14 - final garment: the idea, The draft, and the final toile
Topic: Non-clothing Textile Waste
Issue:
-
Low environmental commitment in the nation to recycle fabric that’s not from clothing
-
Garments are thrown away is because people are unable to find more use for it other than its intended use
Concept: To make an outfit out of fabrics from non-apparels to give users multiple ways of wearing them
Theme/aesthetic: Maximalist fashion
Statistics
-
In 2015, Singapore generated 7.67 million tonnes of non-clothing waste.
-
In 2016, research has shown that Singaporeans are still reliant on “stiff penalties” to be personally motivated in environmental commitment.
-
The number of times a garment is worn has declined by around 36% in 15 years. At present, many items are worn only seven to ten times before being tossed. That’s a decline of more than 35% in just 15 years.
-
Clothes are discarded for a variety of reasons – a garment may still be wearable but no longer attractive to the consumer. Such clothes may be passed on for further use via the second-hand market.
-
The number of times a garment is worn has declined by around 36% in 15 years. The throwaway culture has worsened progressively over the years. At present, many items are worn only seven to ten times before being tossed. That’s a decline of more than 35% in just 15 years.
Concept
-
To make an outfit out of fabrics from non-apparels.
-
Modular clothing. Many layers, more options to change the placement of your garment as and when.
Sketches & Design Considerations
Not all sketches shown, only those deemed necessary for development.


As my topic revolves around the usage of non-clothing textiles, my first round of sketches referenced the silhouettes of said non-clothing textiles such as canvases, tents, and duffel bags. I then decided to combine the sketches into 2 or 3 more variations to show a mix of said textiles.

This was when I realized that I preferred the first sketch more, and decided to develop it from there.

Final Garment of Choice: Modular Skirt
Although this was the garment that I chose to create, this was only the first draft. As I progresed, I realized that I wanted to change multiple things in this design.
Modular Skirt Technical Flat
As shown, I had already modified the sketch. After thinking this design through, I realized that I wanted to add a long strip of fabric that acts as a belt for the skirt, and also as strap for the small bag (which is also a pocket) that rests underneath it. The skirt has also became less flowy, seeing as I am working with calico for this toile, and it is not as drapey as I hoped it would be.
As this is a modular skirt which has multiple uses, I made the bottom half of the skirt detachable to form an asymmetrical top across the body.

_JPG.jpg)
_JPG.jpg)
Modular Skirt Draft 1
Drafting is actually quite enjoyable when you are drafting someone you are looking forward to producing. Just like the sketch of the garment, I had made multiple changes to the draft. For example, originally I wanted bound pockets (as shown with the double lines on both sides of the skirt), but after a lot of consideration, I realized that a singular welt pocket would look much cleaner.

Modular Skirt Draft 2
Instead of the front and back of the skirt be separated, I decided to tape them together to form one large draft. Doing this also helped me to modify the curve which separated the top and bottom of the skirt such that the start and end points meet one another. Every other circle shown are where I'd like the snap buttons to be, for they are to be attached to additional fabric at a later point in time.
Draping the draft
I once saw an Instagram reel of someone draping the paper draft of their garment to view how the points created at the ends would meet, and that was exactly the reason why I draped it the same way. I could also vaguely see the shape of the skirt that it would form, so even though it seemed weird, it did actually help me modify my lines.


_HEIC.png)
_HEIC.png)
_HEIC.png)
_HEIC.png)
Modular Skirt Calico Drape 1
After draping the paper draft and making new edits, I cut up the general shape of the skirt on leftover calico from previous draping exercises and did the same thing as the previous step, view the garment from every angle and take note of any changes to make or anything to remain. I did not find anything wrong with the alignment of the side seams, and then proceeded to cut away the bottom half of the skirt, seeing as that is the part that is detachable from the skirt to form a cross body top.
_HEIC.png)
Modular Skirt Calico Drape 2
To be honest, I was wracking my brain in deciding what to do with the bottom half of the skirt that was meant to be worn another way, to be true to the word 'modular' in the title of the garment. I am the kind of person who will only make changes when I have seen the draft of the product in a 3 -dimensional sense rather than envisioning it in 2D. In other words, I am better at viewing potential edits and additions when draping instead of when sketching or drafting.
After playing around with the bottom half of the skirt, I decided on laying it across the body to form a top which still covers any sort of indecency on an actual person. I was quite taken with the vision, and made it my goal to make this top more flattering to the eyes.
Modular Skirt Calico Drape 3
After draping on the tailor dummy, I was suggested to try draping on Shirley, the resident mannequin that resides in one of the classrooms we use. I quite like the look of the asymmetrical skirt on her, and I proceeded to map out where my back pockets would be.
The reason why there was a smaller pocket on the wearers' left on the back piece and a bigger one on the wearer's right, is because I realized that the smaller pocket was a bit too small for my liking, and so I had it sized up a smidge.
Not only did I mark out the back pockets, but I also pinned where the welt pockets at the wearers' left and right are, and all the snap button placements.
_edited.png)
_edited.png)


Skirt Top Half Final Pattern
When satisfied with my draft, I finally traced and cut them out as the final pattern. Of course, since this is draft 1 of the toile, there may still be changes to be made, but for now, I feel accomplished enough to have drafted and draped a modular skirt.
Skirt Bottom Half Final Pattern
As this part of the skirt is supposed to detach itself from the top half and wrap around the body across the torso, the final pattern became a very long curve of the skirt. Tracing and cutting this out was a pain, but I had to remind myself that it would be worth it to see my vision come to life.
Front
Back

Waistband Final Pattern
Of course, cannot forget the most important piece of a skirt, the waistband. I was surprised to learn that it was just a long straight rectangle, seeing as the skirt is curved at the top. But then I remembered that when I draped the skirt on the tailor dummy and on Shirley, the curve transitioned into a pretty straight line.

Cutting out the Calico
After two beguiling weeks of drafting and draping, it was time to cut it out on the fabric itself to start sewing the first draft of the toile.

Reflection:
This quest began with a blank canvas on PhotoShop and my trusty tablet. I allowed my creativity to flow as I sketched the design for the skirt. It was a thrilling moment when my vision started to take shape on screen. Each stroke of my tablet pen represented the layers of fabric and as I added intricate details to my design, I felt a connection to the artistic side of sewing, where fashion becomes a form of self-expression.
With the technical flats as my guide, I moved on to the technical aspect of creating the skirt. Drafting the pattern was an eye-opening experience, as it involved translating the two-dimensional sketch into a three-dimensional form. Precision and measurement became my allies as I meticulously calculated the dimensions, angles, and shapes necessary to bring my design to life.
This stage brought home the importance of accuracy in drafting, just like when I was drafting the blouse with the peter pan collar. It was like solving a creative puzzle where every centimeter and angle played a crucial role. The sense of accomplishment that came with having a pattern ready was unparalleled. It was a blueprint for the garment, a piece of my imagination in physical form.
Draping was the bridge between the flat pattern and the fabric. As I pinned and draped the fabric on the tailor dummy, I was able to visualize how my design would look in real life. Draping taught me that sewing is not just about lines and angles; it's also about understanding the tactile and visual aspects of fabric. It required patience and a keen eye to ensure that the fabric fell gracefully and that the seams were in harmony with the design.
YEAR 1 SEMESTER 2
week 1 - 3


Dress drape sketch
For our first exercise of the semester, we were tasked with draping a full dress on a tailor dummy to further increase our knowledge in draping.
Before starting on the drapes, we of course had to sketch out what we wanted to create. I drew the first two sketches at first as shown in the picture on the left, and then further explored them to form the next two sketches. I wanted to drape diagonal ruffles and toga tops, thus the asymmetry shown in all dresses sketched. Eventually, I decided on the 4th sketch in the left picture.
After drawing the full front and back view of my chosen dress, I had to split the bottom half of the dress into three layers, seeing as they are draped atop one another.


Style tape
Before starting to drape fabric onto the tailor dummy, I first started to the pin style tape in the shape of a toga top to guide me on where my dress's base should start and end.


First drape
Before draping the actual dress, I used white linen to drape a simple bodice to serve as the base of the dress. Afterwards, I settled on a dusty blue polyester fabric for my dress and cut off a large rectangle piece to start as my first toga drape across the tailor dummy.
I made a few pleats on the shoulder according to my sketch, and let the excess fabric hang freely.

Continuation
This is where my dress is finally starting to form into something wearable. After making the shoulder pleats, I focused on draping the arm hole and pinned the raw edges to give it a nicer finish.
I then set to work on the wearer's left side of the drape, which is the larger pleat that runs across the bust. I let the excess fabric hang freely as well to give the drape some shape.

Continuation 2
After layering the bigger pleat across the bust, I cut off the excess fabric at the bottom and laid them out neatly in preparation for the lower half of the dress.
To conquer the bottom, I separated it into three parts, the bottom most layer, the second layer that rests atop of it, and the third layer on top of the second. After separating them, I continued on to finish my dress.

Continuation 3
As mentioned previously, I had three layers at the bottom separated to drape easier. In this picture, I was draping the first layer and intentionally making it long.
Final drape and Reflection:
Draping this dress from scratch with little prior knowledge of proper draping techniques was a challenge from the get-go.
The prospect of starting with a blank canvas, filled me with a sense of excitement and curiosity in learning how to drape. Without the constraints of established techniques, I was free to approach the process with a fresh perspective, uninhibited by rules.
Yet, draping this dress also required courage in acknowledging that I will make mistakes and resilience. Draping entails a series of trial and error experiments, with no guarantee of success. It demanded patience, perseverance, and a strong will to see this design through.d
As I delved into the process, I aas confronted with the complexities of fabric manipulation, garment construction, and design aesthetics. Each fold, tuck, and pleat becomes a deliberate choice, informed by instinct and intuition rather than formal training or expertise. Yet, with each adjustment and refinement, I am not only honing my technical skills but also tapping into a deeper understanding of form, proportion, and movement.
In the end, though the final drape looked a bit different than the initial sketch, I am still quite proud of the outcome. There were many ideas that came and went as I was draping, and I did my best to add them all in.

YEAR 1 SEMESTER 2
week 4

Pants block
After looking forward to making my own pants to practice making them for my own use in my edgy aesthetic, we finally had the time to make them. Of course, we started with tracing the pants block on cardboard as our own template.

Pants draft
Of course, adjustments must be made after tracing out the pants block. My sizes are similar to that of the model size, but I increased the hip size slightly for ease, and widened the pants to look similar to straight legged office pants.


final pattern
After finishing the final lines on my draft, I cut out the final patterns to pin onto my chosen fabric


PANTS FINAL PATTERN FRONT & BACK
pocket FINAL PATTERN
fly & fly shield FINAL PATTERN
back pocket FINAL PATTERN

waistband FINAL PATTERN

sewing
I chose a dark grey wool fabric for my pants to emulate work pants and also because I was in dire need of another pair of straight leg pants for everyday wear. What I failed to realise after cutting the fabric and sewing it together was that the fabric frayed easily and it was very slippery, so I had to use many pins to keep my pieces in place.


Back dart and back pocket
Starting off with the back dart to form the curved shape for the back, we also sewed on the back pocket. As mentioned, I was handling a quite slippery fabric, thus I was not able to sew the pockets in the exact place I wanted them to be due to it always moving even after pinning it down. Alas, I just moved on and sewed both pockets on both pieces of the back pants.


Overlocking
Unfortunately, with how faulty our overlock machine was throughout our whole pants process, I was only able to overlock a few pieces, namely, the fly shield, pocket mouth, back inseam, and fly.


Overlocking
Unfortunately, with how faulty our overlock machine was throughout our whole pants process, I was only able to overlock a few pieces, namely, the fly shield, pocket mouth, back inseam, and fly.


Fly
Before working on the zipper fly, I had dreaded it. I thought that it was the most difficult part of making pants and I've seen tutorials where the creators made them look complicated than they actually are. Turns out they really are not that complex. I searched for easier tutorials to guide me but I ended up studying how they're sewn on actual pants instead. Afterwards, I was able to sew the zipper fly with ease.


Side seam and inseam
After the fly was sewn, it was time to attach all pieces of the pants starting with the side seam. Afterwards, we sewed the inseam together and that was when our pants were finally starting to take shape.


Waistband
Finally it was time to start on the waistband and attached it to the pants fly. I thought that this part would be straightforward, but I messed up quite a lot due to the side seams not matching up. In the end, I just finished it irregardless of the seams.
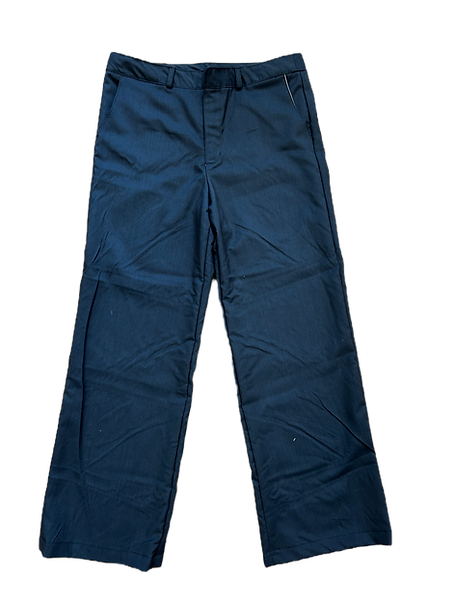
Final pants and Reflection:
As I finally sit down to sew these pants, something I've been eagerly anticipating since school , I find myself filled with a sense of excitement. As I work through the construction of the pants, I encounter challenges and obstacles along the way. With each seam I stitch and each adjustment I make, I gain a deeper understanding of pant construction and the intricacies of sewing.
As I near the completion of the pants, I feel a sense of pride and accomplishment. Seeing the finished garment taking shape before my eyes is immensely gratifying, and I can't help but marvel at how far I've come since I first embarked on this sewing journey even though I struggled at certain parts of it.
In the end, sewing pants have been a rewarding and fulfilling experience, giving me ideas to make even more pants in the future.

YEAR 1 SEMESTER 2
week 6 - 9


process


first toile


Final outfit and presentation critique:
- add more functions to the outfit (add the arm sling from the initial sketch, turn the bottom pants panel into something, etc etc) to bring back the point of having multiple uses in one garment
- add more pics, less text
- fabric consideration need not be super specific
- can add accordion pockets to give more outward space to fit in things
- can consider how the things you’re gonna bring into a plane will affect security checks (eg, metal detectors therefore can’t put in jewellery, etc etc)
- follow the initial sketch instead cause it has more functions
- bottom line is ADD MORE FUNCTIONS TO BRING BACK MY POOIIIINNNNTTTTTT
- sleeve and jacket hem can lower down by 3cm
- pants top panel can bring up to above the knees
- bring down the crotch
- pockets need not be visible, outfit could just be one colour so all or most pockets are hidden in plain sight (can also be hidden inside panel seams)\
- anyway just go full maximalism !!!!!!
- improve moodboard
- improve slide design

YEAR 1 SEMESTER 2
week 10-12

second draft


final jacket worn by both mannequins


female mannequin
male mannequin


Final 2nd jacket toile and Reflection: